AI Social Content Generator by Predis.AI helps you create a library of fresh, brand-friendly images and video content for your social platforms. No more endless brainstorming! Now, with the help of AI, you can quickly create and edit the perfect content to represent your brand online.
You can find AI Social Content Generator in the Semrush App Center.
How Can AI Social Content Generator Help Me?
Here are just a few benefits of using AI Social Content Generator:
- Generate fresh content at scale for Facebook, Instagram, TikTok, YouTube, and more
- Maintain consistency with personalized branding and tone
- Analyze top competitors to find the most effective post types and topics
- Create a variety of content types, including videos, carousels, images, quotes, and more
- Stay active on social media by creating relevant content more quickly
Pricing & Limits
AI Social Content Generator has two pricing options:
App Subscription: $35/month includes:
- Create and manage content for two brands
- Generate up to 200 posts per month with AI
- Perform 100 competitor analyses per month
AI Social Generator Plus Add-On: +$20/month (in-app) includes:
- Create and manage content for one additional brand
- Generate an additional 100 posts per month with AI
- Perform an additional 50 competitor analyses per month
- Can be purchased multiple times for expanded access
What Is Included in AI Social Content Generator?
AI Social Content Generator’s features cover three categories:
- Content library: Create and maintain a library of video, image, carousel content, and more, manually or with the help of AI
- Competitor research: Analyze your competitors’ growth, strongest post types, and topics
- Brand management: Create and maintain a brand style, including colors, logos, font choices, and more
We’ll cover each in more detail below.
Setup & Navigation
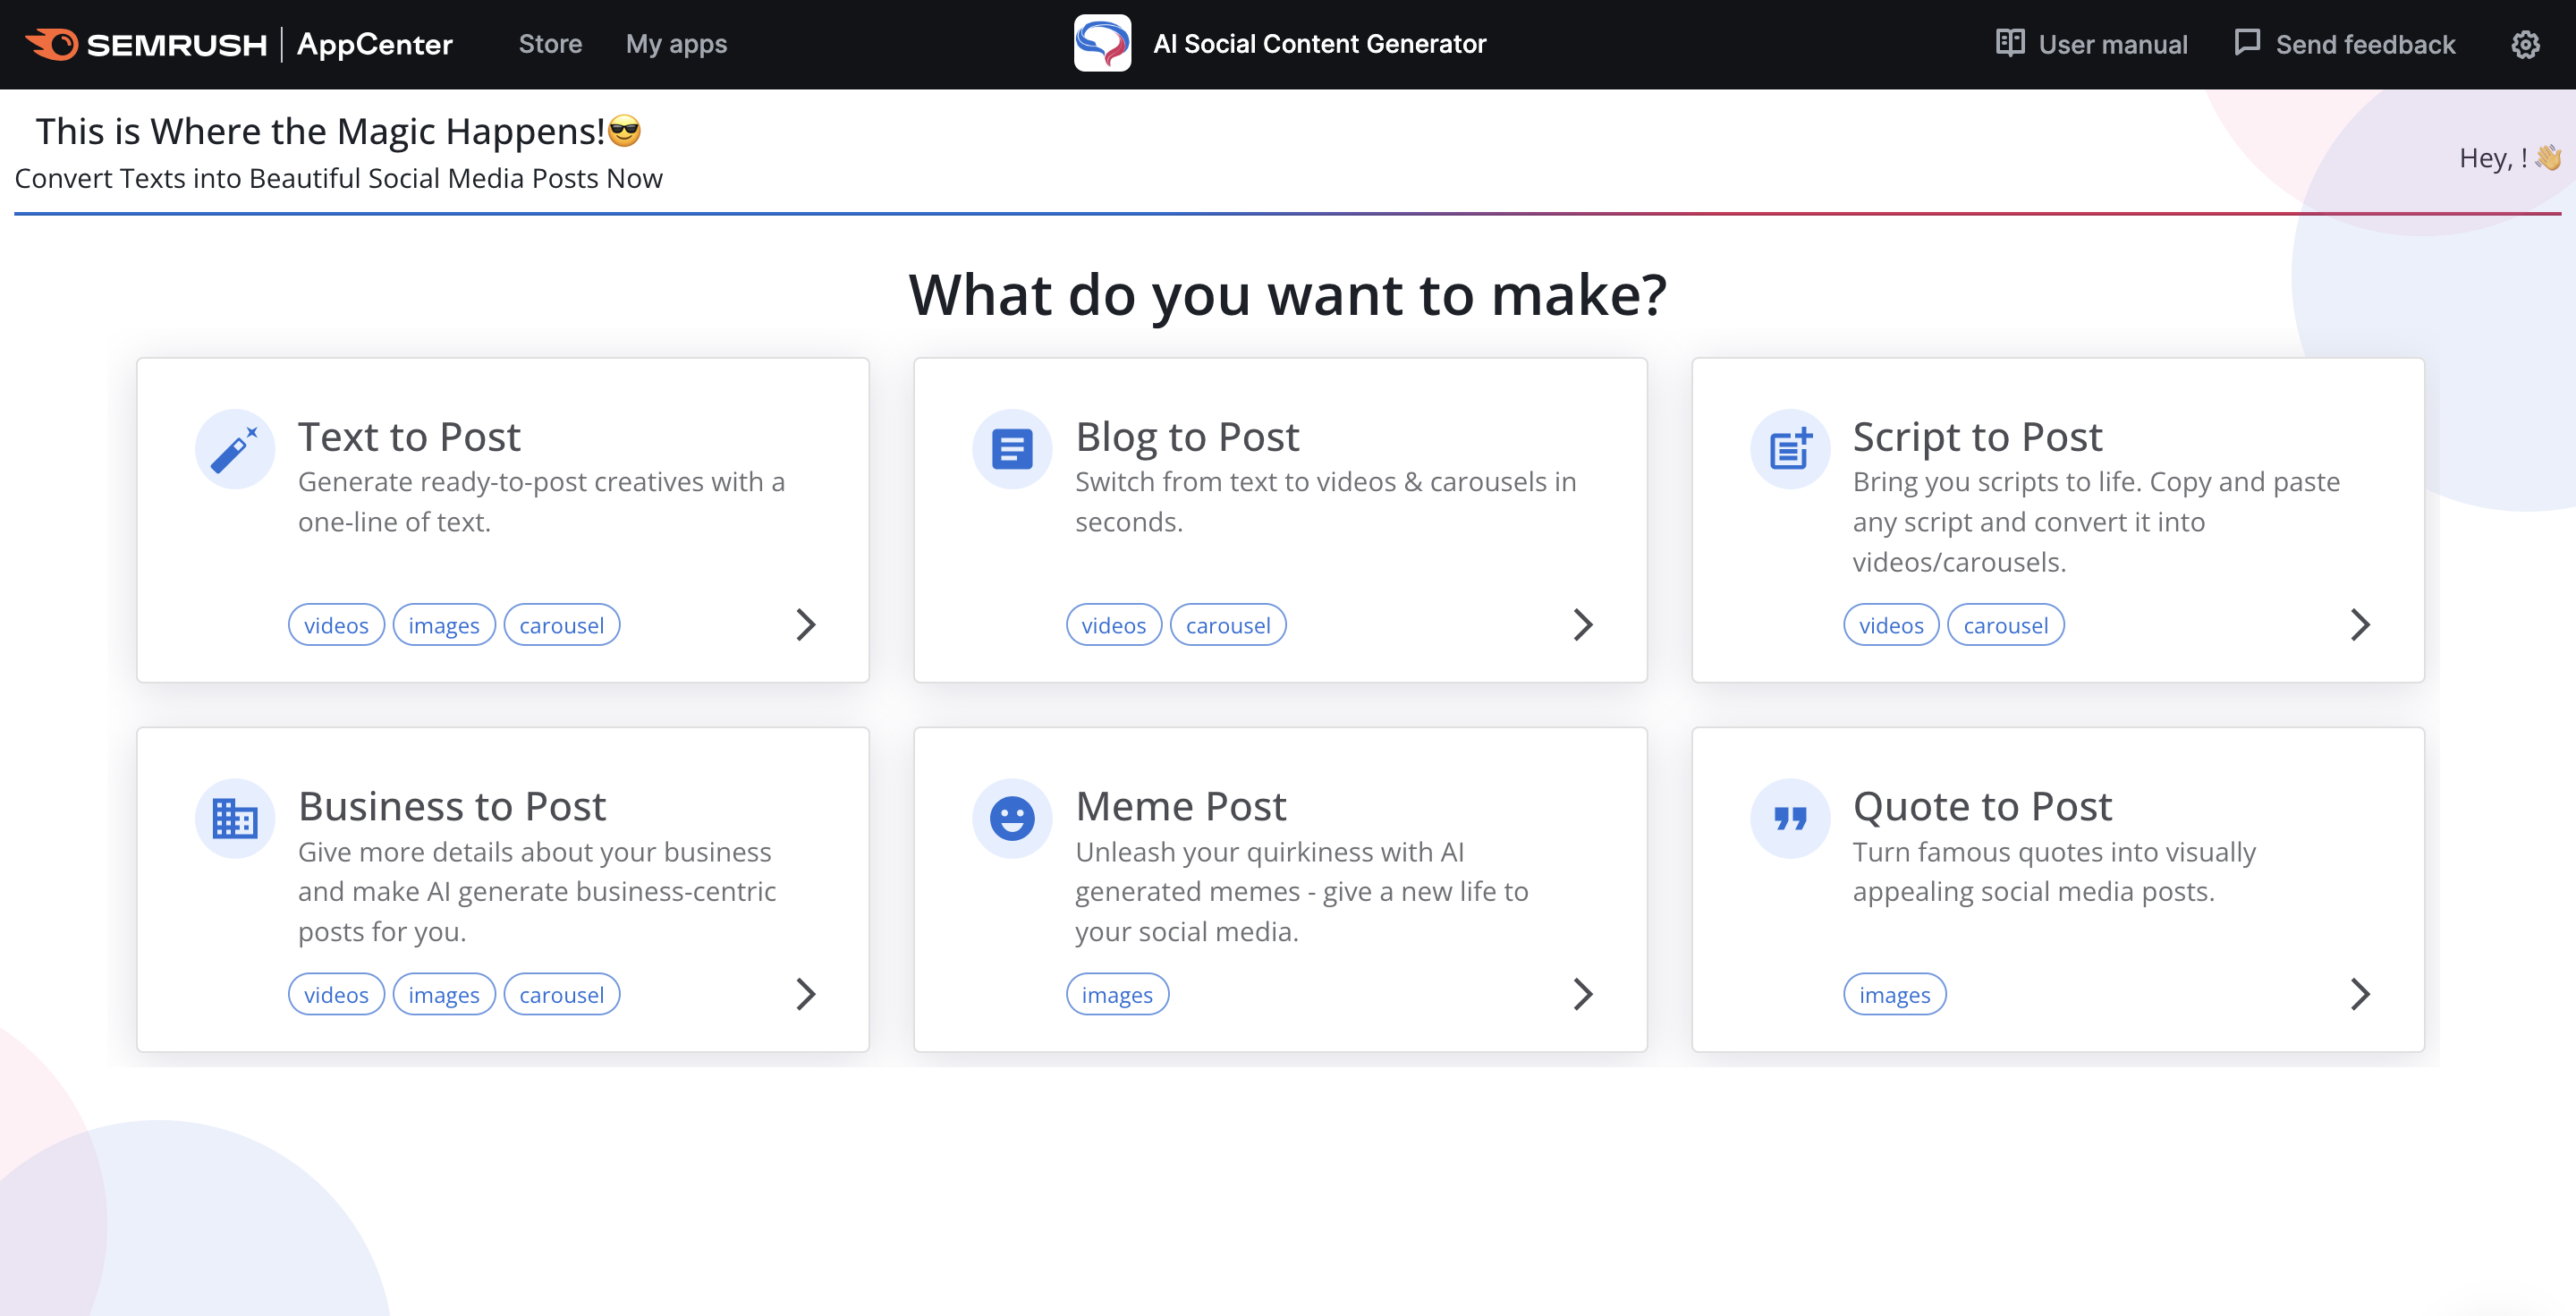
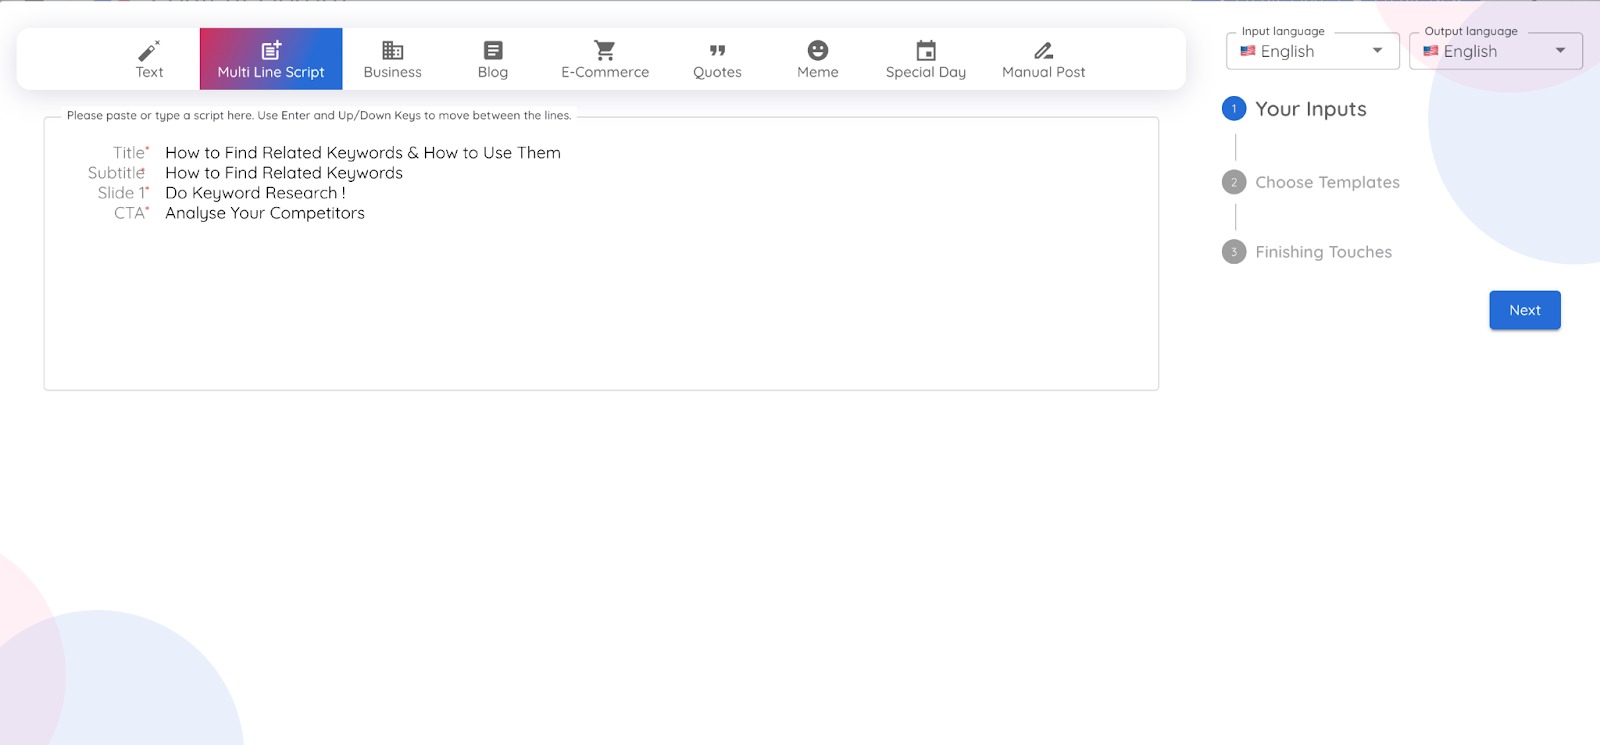
The first time you access the app, you’ll be greeted by a prompt to select the type of post you want to create.
For this process, you’ll need to provide:
- An idea or post prompt
- A desired template from the available gallery
- Input and output languages
- Your brand logo (if you have one)
- Your brand colors
- Your brand’s font (or just one you prefer to use)
If you change your mind about your brand details, don’t worry. You can update your branding later in the Brand Management tab.
Then, the tool will generate your first posts. It’s that simple!
Now, you’ll get to see the app’s main interface.
The first section you’ll see is the Content Library. To go to a new section, you’ll need to use the menu on the left. By default, this will be collapsed, but you can expand it by clicking on the menu icon, which is three horizontal lines or  .
.
Here’s what the menu looks like when it’s expanded:
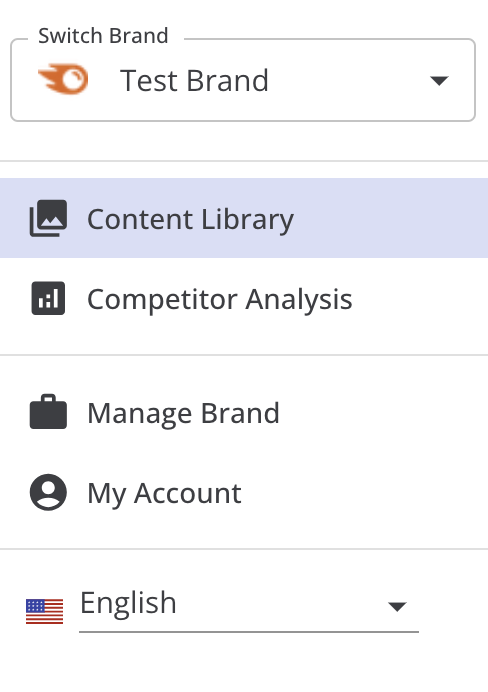
In this menu, you can "Switch brand" and choose the app’s language (using drop-down menus at the top and bottom)
You also have four navigation options that will lead you to different sections in the app:
- Content Library
- Competitor Analysis
- Manage Brand
- My Account
We’ll go through each of these sections in more detail below.
Content Library
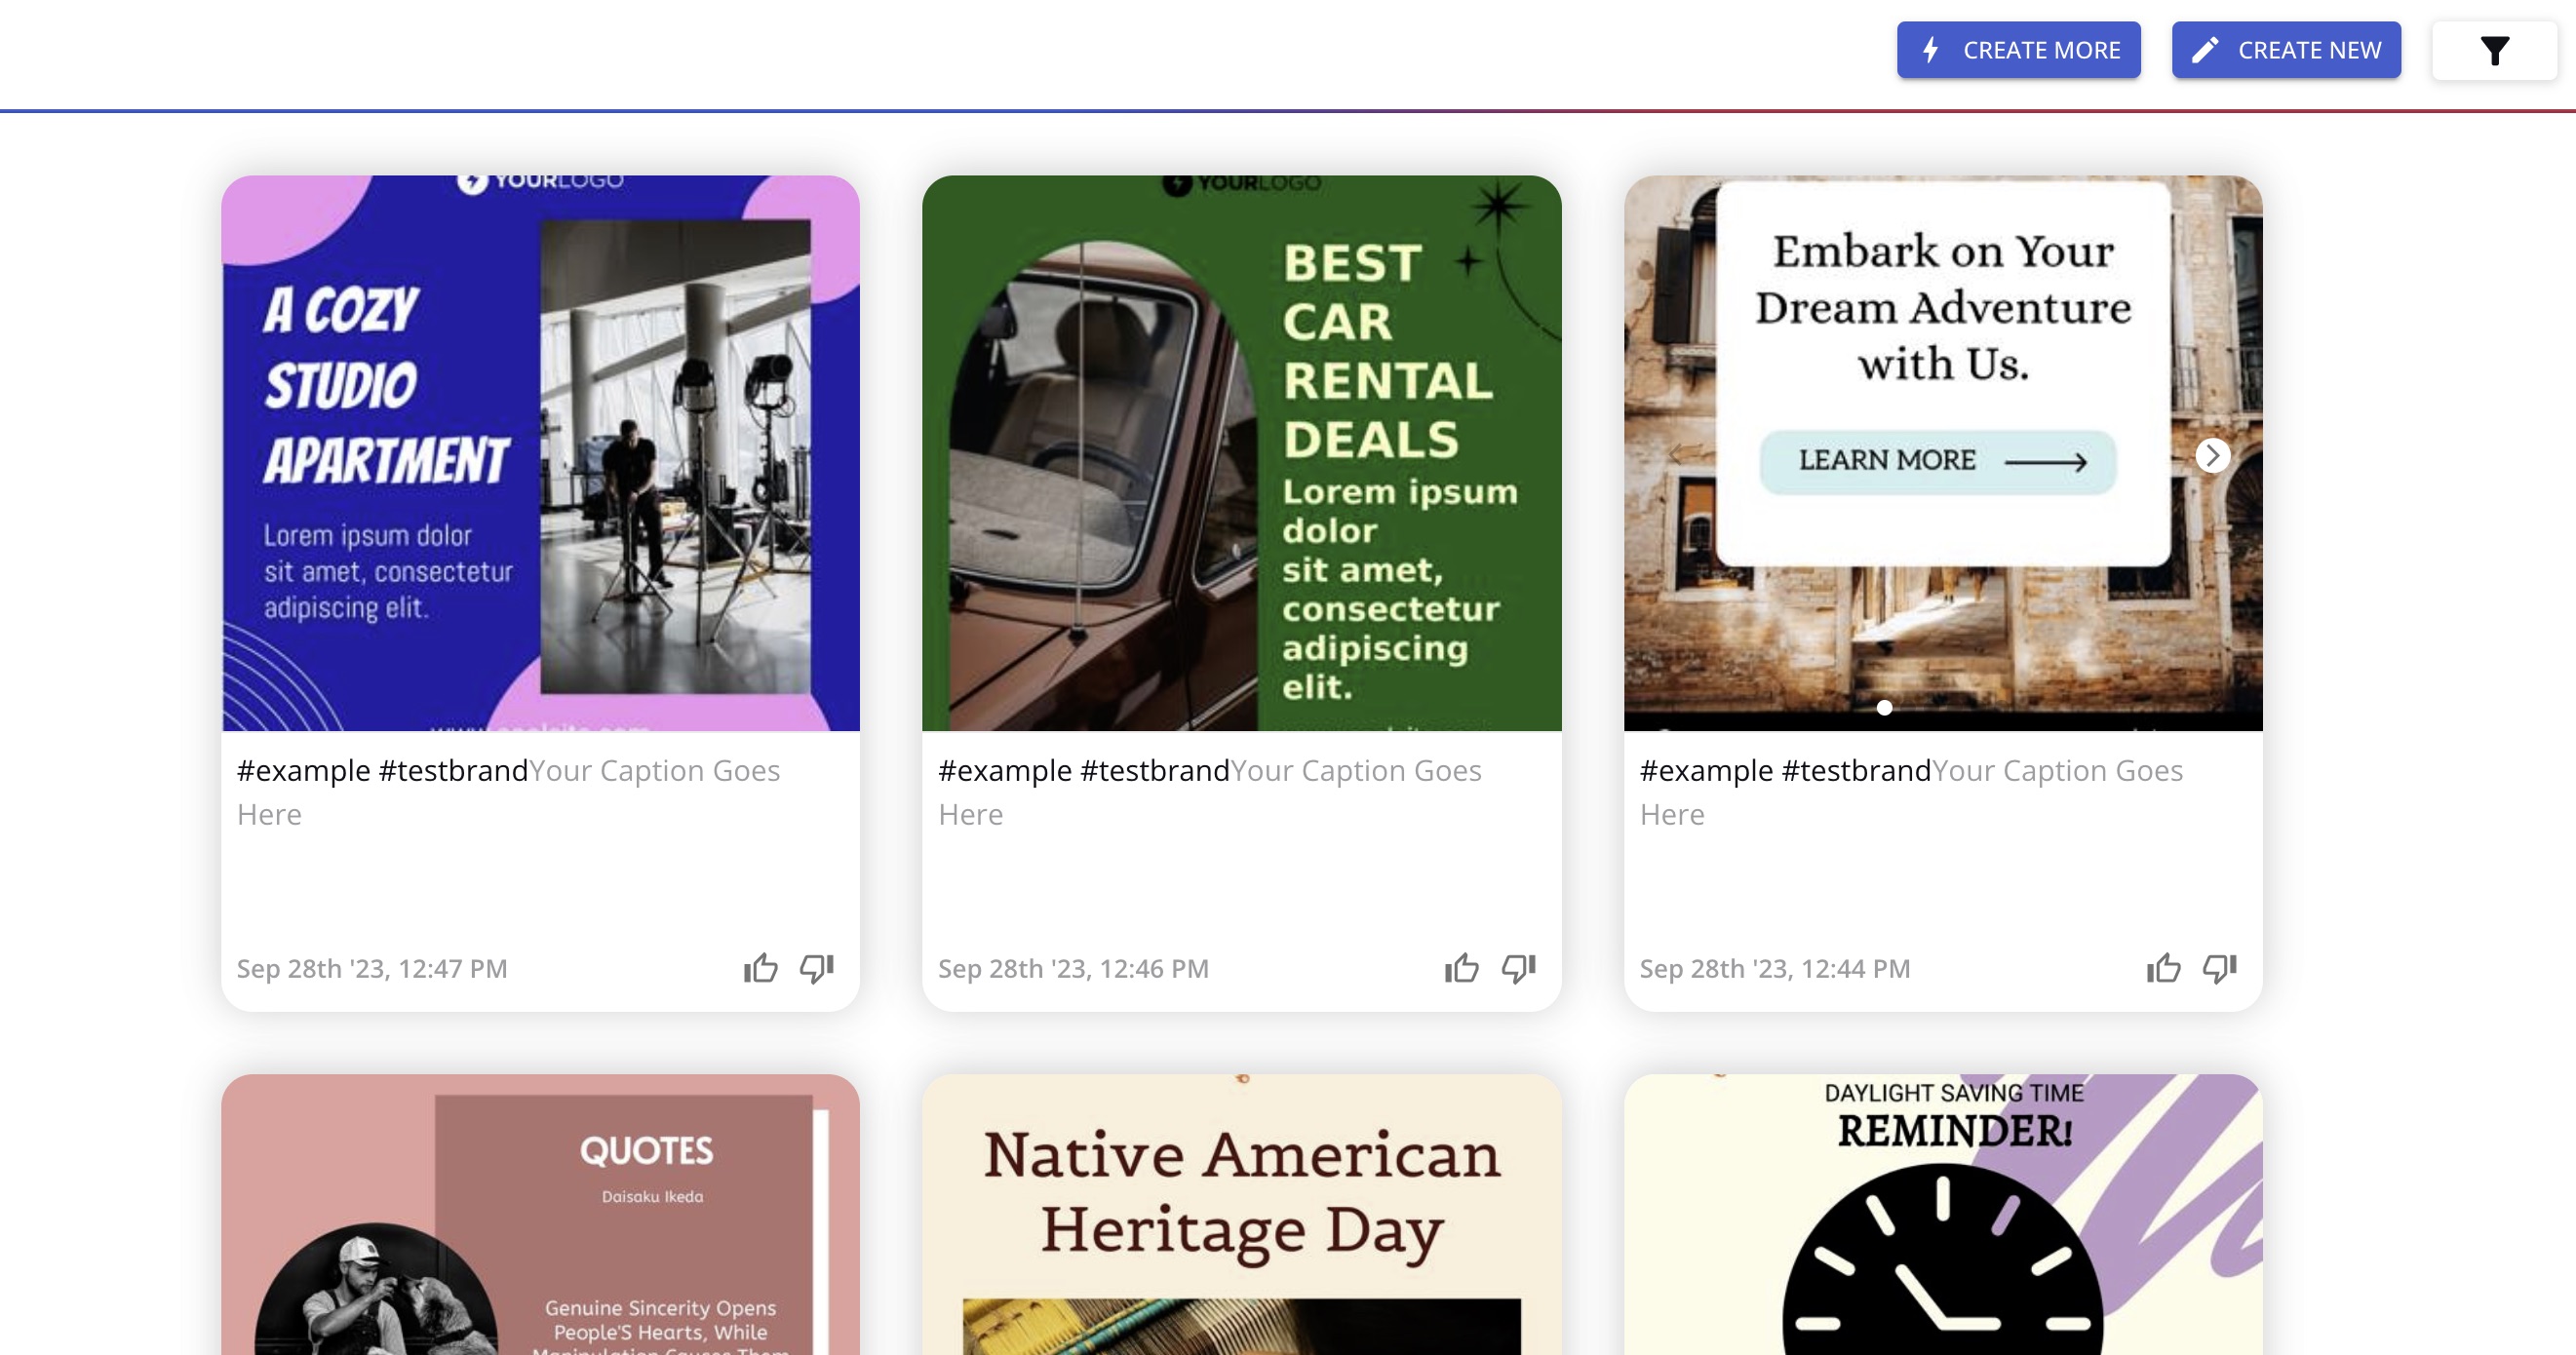
The Content Library page is where you can find all the content you’ve created for your brand.
Find it by expanding the left menu. The Content Library is the second menu option beside the stacked image icon.
In the center of the screen, all the content you’ve already created for your brand is displayed in tiles.
To search or filter your library, click the filter icon in the top right corner.
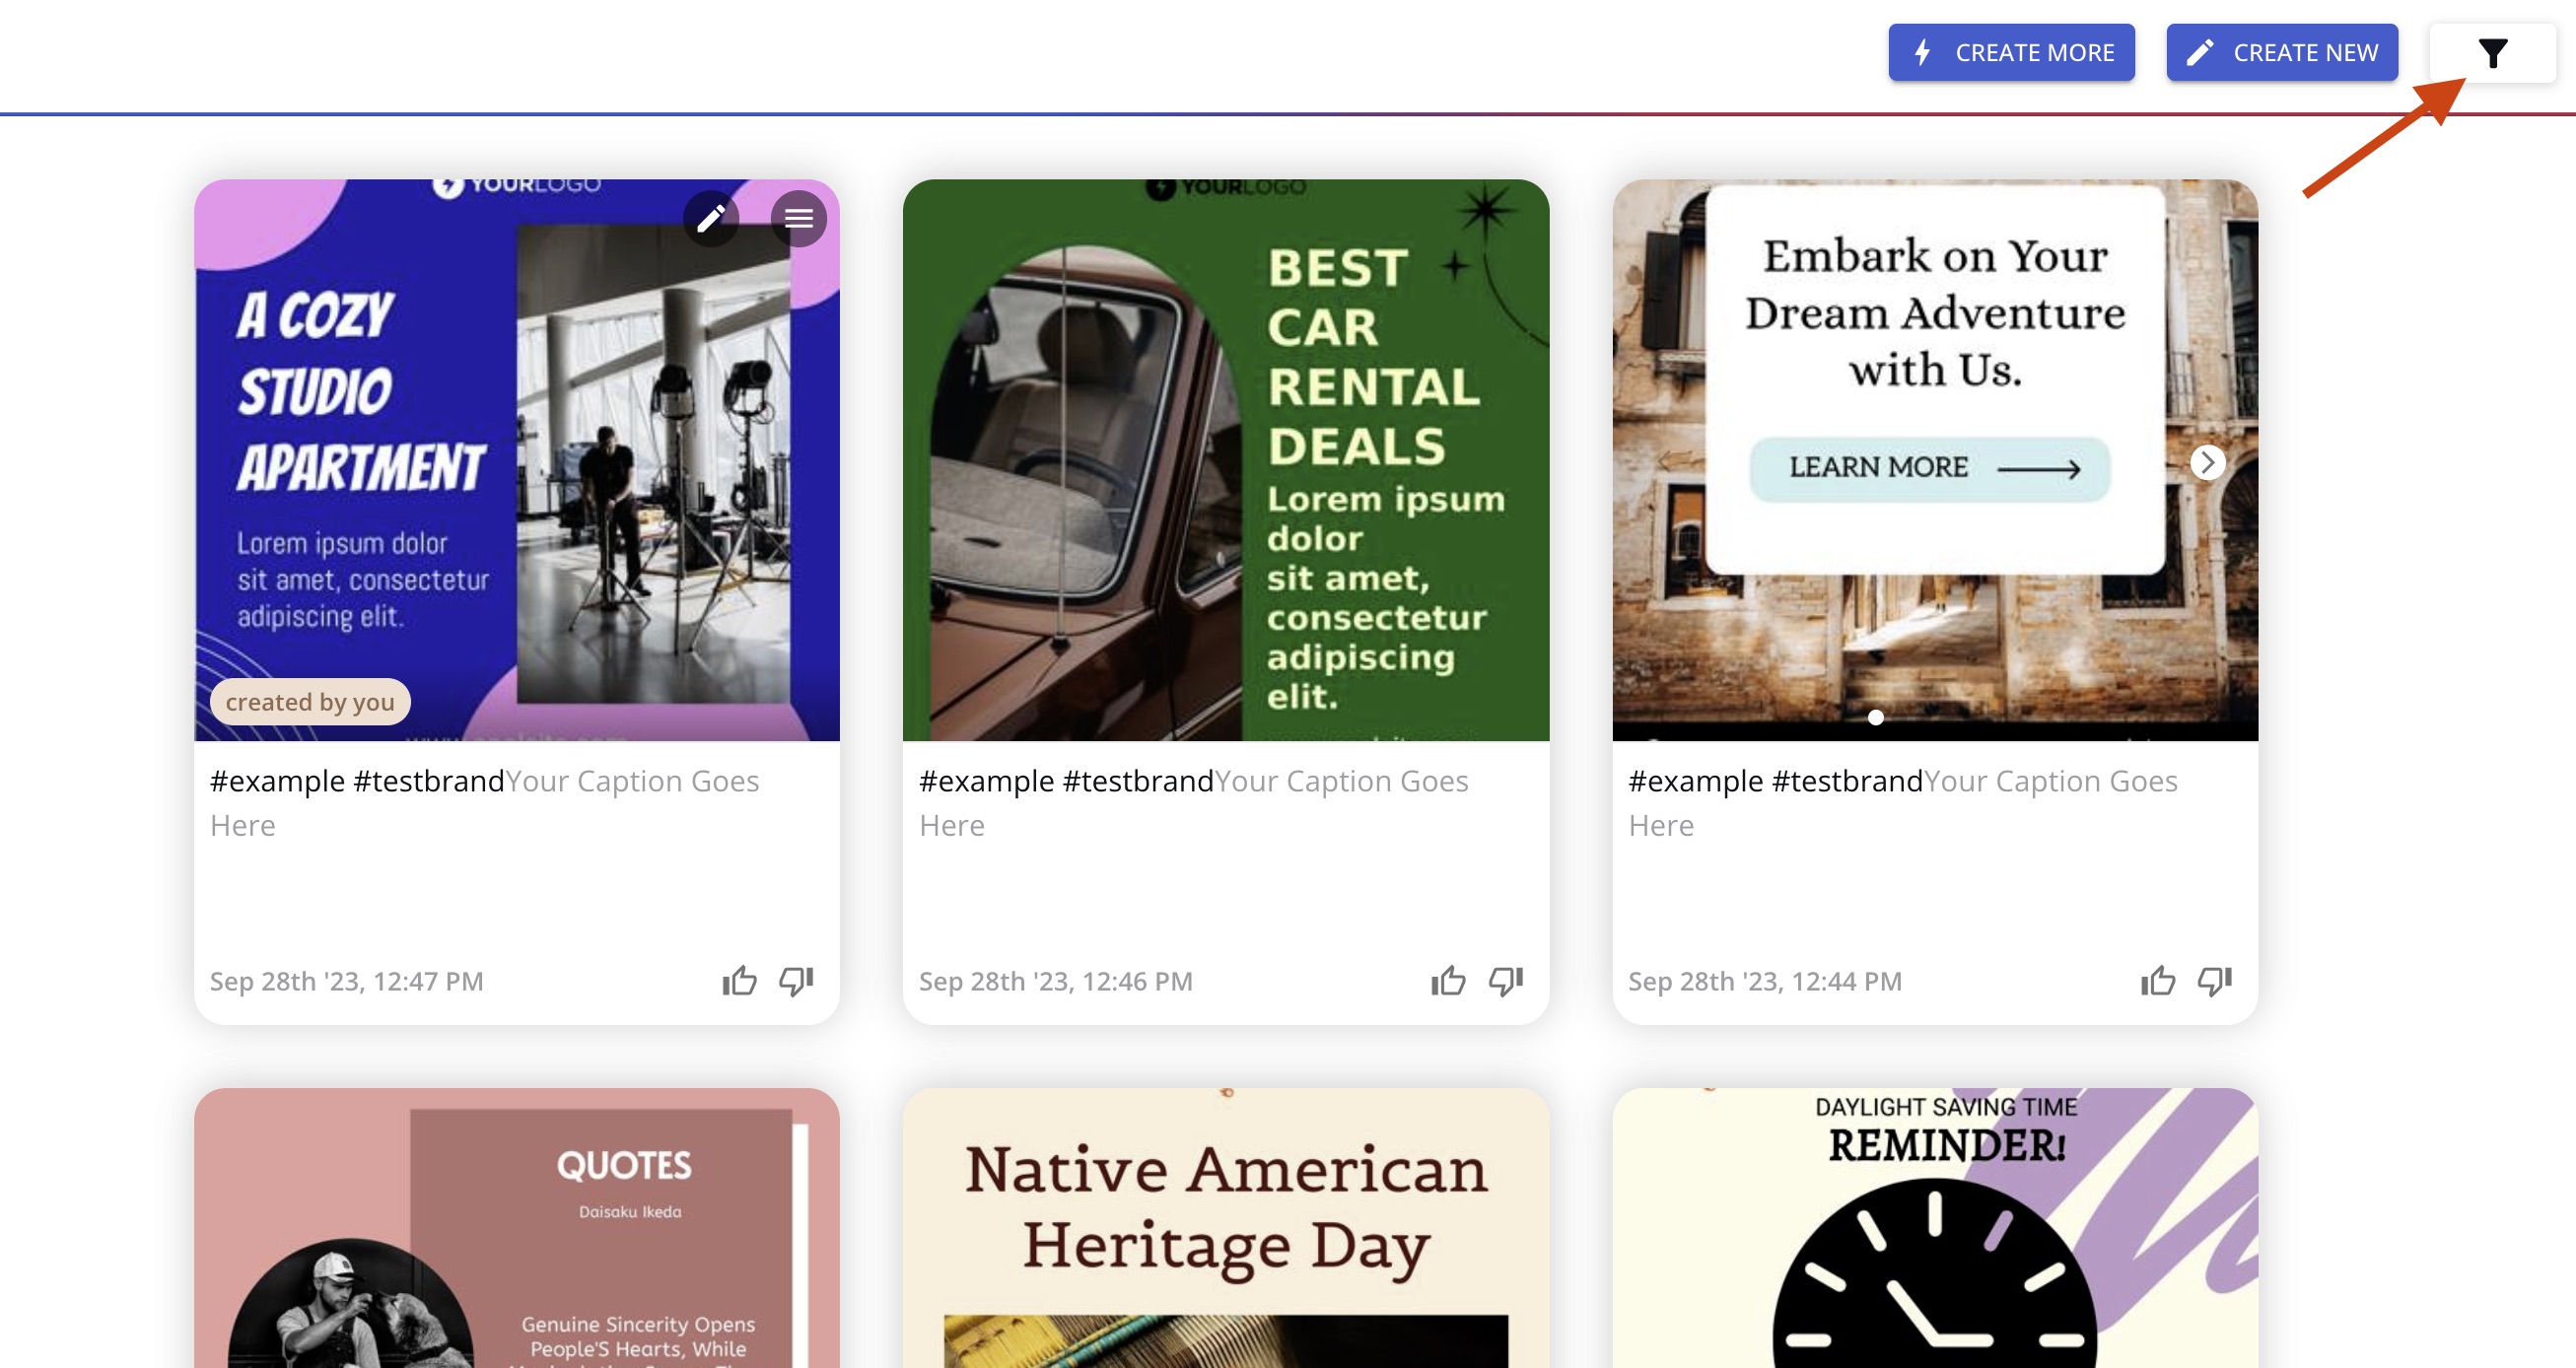
The filter menu will appear as a frame in the middle of your screen.
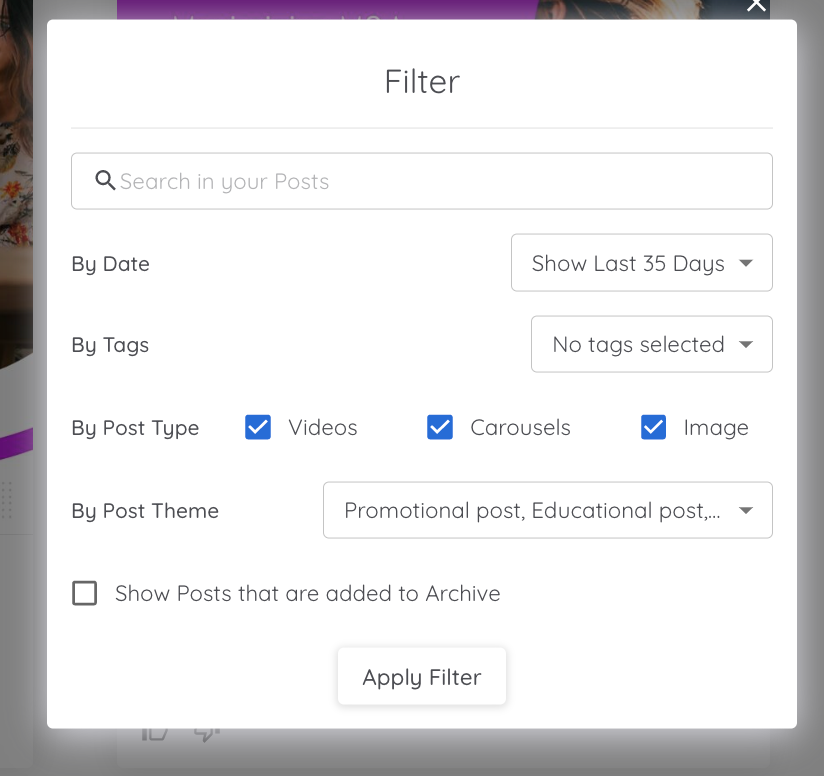
Here, you have a few options:
- Search: Enter a keyword or phrase into the text box
- Filter by date: Select a date range (options include the last 7, 15, or 35 days, or a custom date range)
- Filter by tags: Include or exclude posts that are tagged “scheduled,” “published,” and/or “failed”
- Filter by post type: Include or exclude videos, images, and carousel posts
- Filter by theme: Select from the list of available post types (find the complete list here)
- Include or exclude archived posts
Simply set your filter preferences and click “Apply Filter.” Now, your Content Library will display only content that aligns with your filter preferences.
You also have a number of organization options within each tile. Click a tile’s menu button (three stacked lines) to get started.
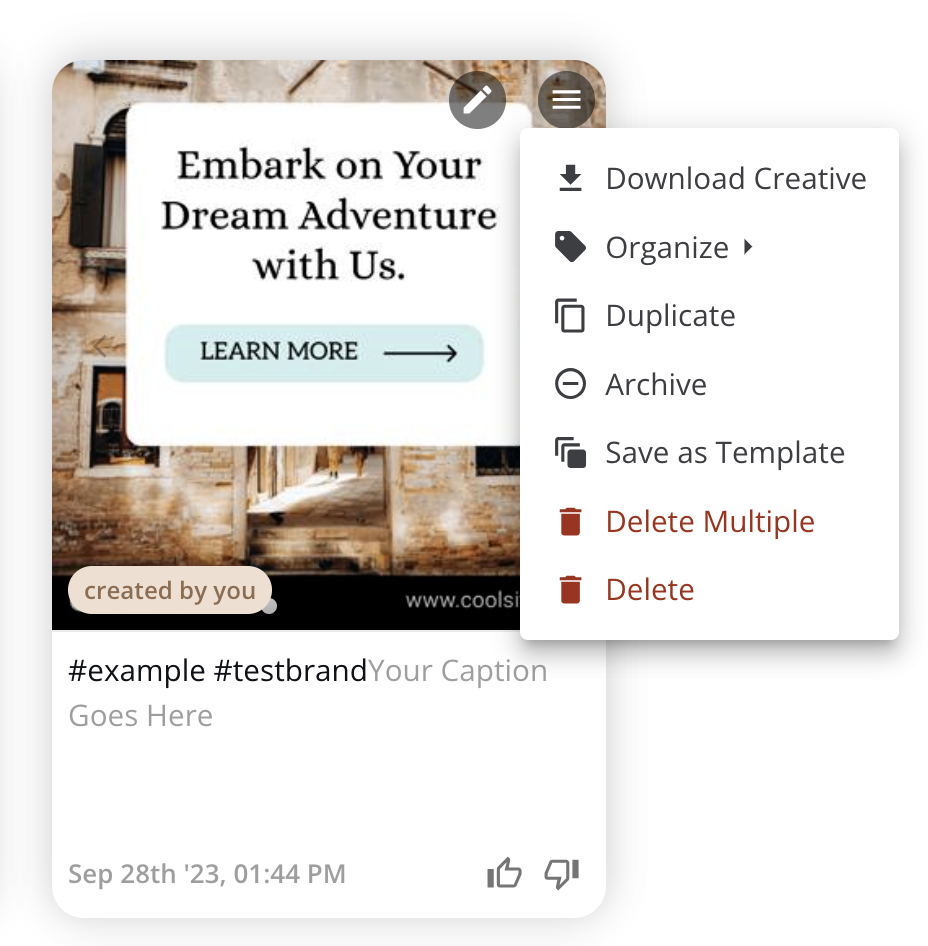
Here’s what you can do:
- Download Creative: Save the images or video so you can upload them to your social platform later
- Organize: Add custom tags to your content so you can filter for them later
- Duplicate: Make a copy of that piece of content
- Archive: Hide that content in your library without deleting it (it won’t show up unless you enable archived content in your filter)
- Save as Template: Make that post into a reusable template so you can create similar posts again and again
- Delete Multiple: Select more than one post to delete from your library
- Delete: Delete only this post from your library
How To Create New Content
You can create new content from the Content Library page. There are a few different ways to do this.
First, to generate multiple new posts with AI, click the “Create More Posts” button.

The app will then generate two more fully editable posts based on your brand info and previous information you’ve entered into the app. For example, if you’ve created a business post before (see below), the app may use that info again now.
To create one new post based on your preferences, click the “Create New” button.

This will initiate the “What do you want to make?” window.
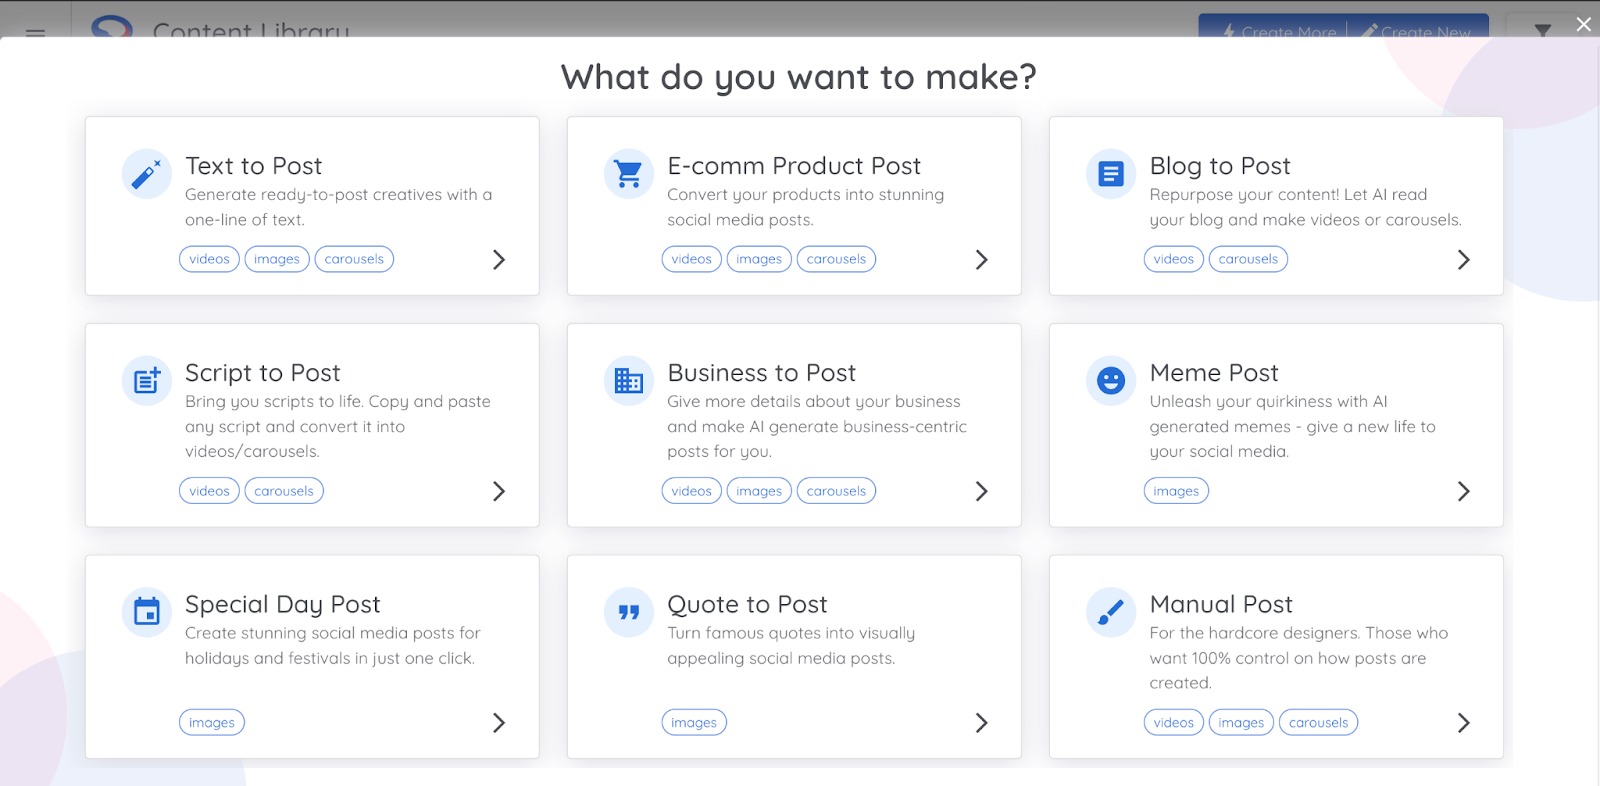
Select your prompt type to get started.
This post is created based on a topical prompt.
To create one, use the text input field to describe your prompt and click the “Next” button. You can also set preferences for the future post language before generating it at the top right of the window.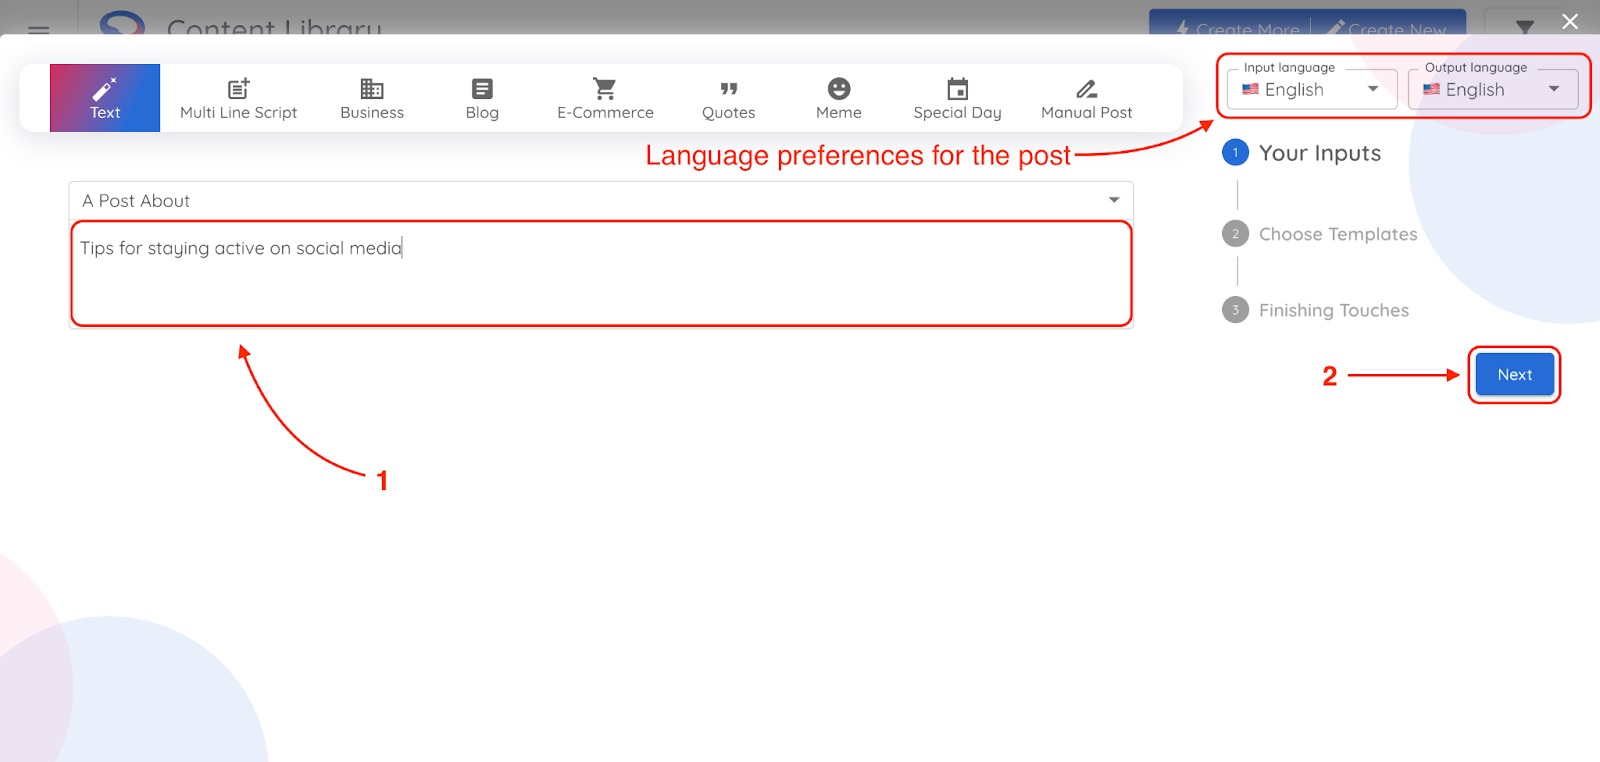
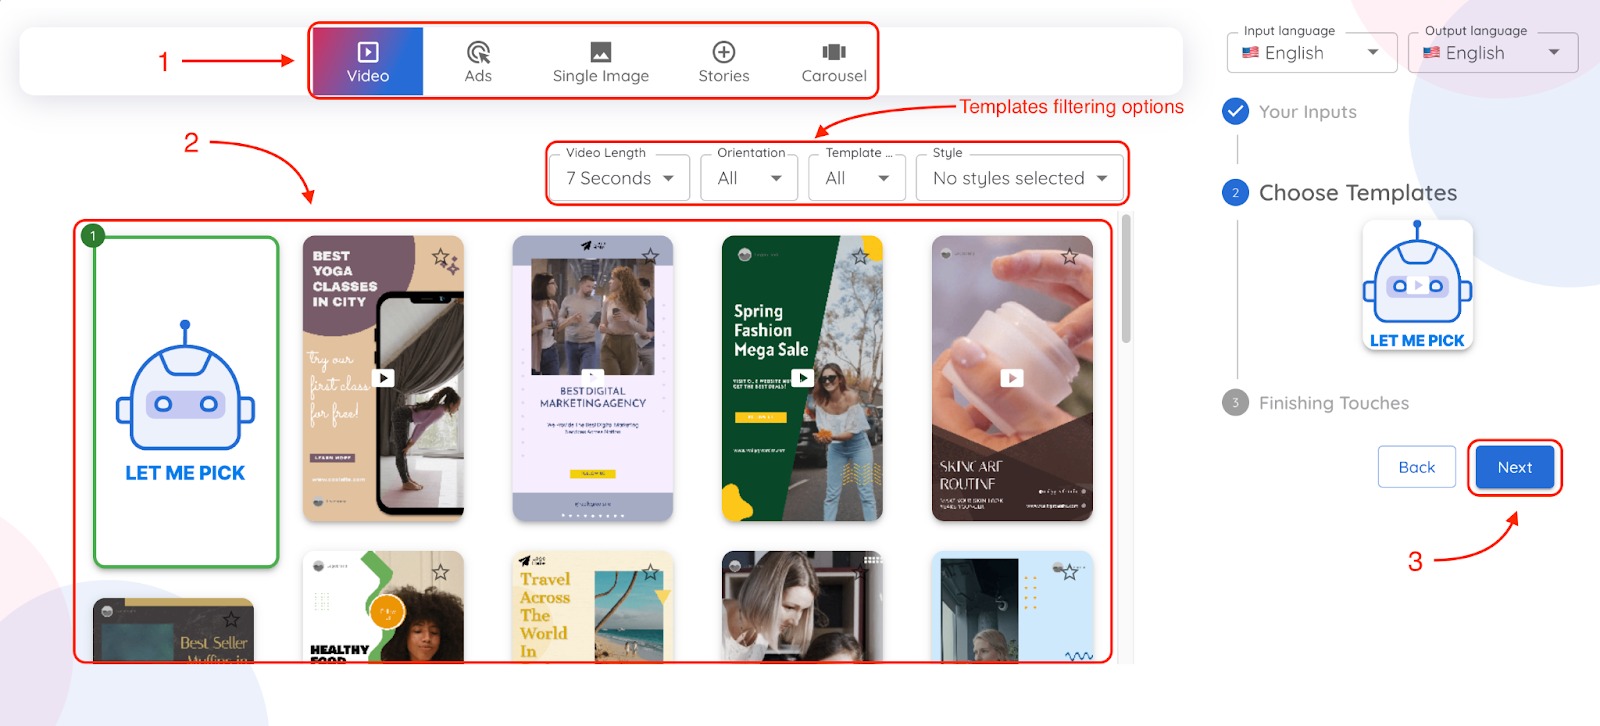
Next, you’ll be invited to select your post type (Video, Ads, Single Image, Stories, Carousel) and choose the template from the ones available. You can also let AI pick it for you. Click on the “Next” button for the final step of generating the post.
In the final step, “Finishing Touches,” you’ll see two tabs: Assets and Advanced.
In the Assets tab, you can select your media source (open-source images or ones you’ve uploaded manually) or let AI select assets for you.

In the Advanced tab, you can set up the color palette (your brand palette or AI-suggested one) and the tone of voice of your post.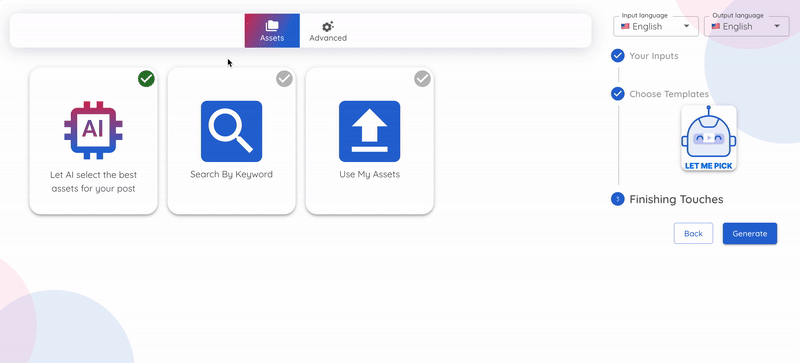
Click the “Generate” button to get your post.
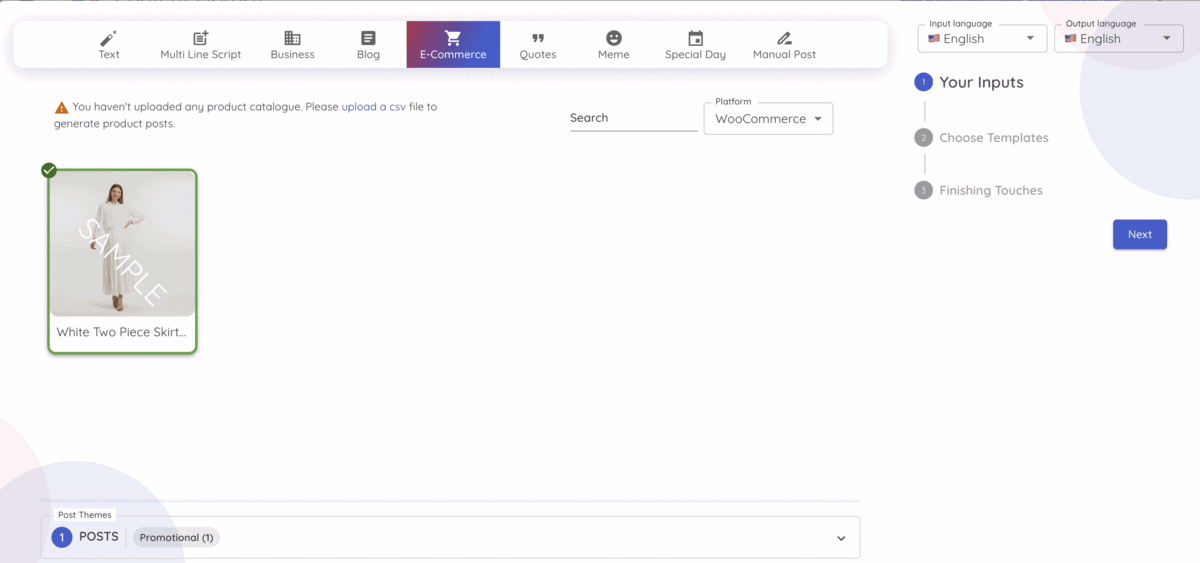
E-comm Product post allows you to create an e-commerce post using your product catalog. Simply upload a product catalog file and choose your post type, template, color palette, and tone of voice to generate your E-comm Product Post.
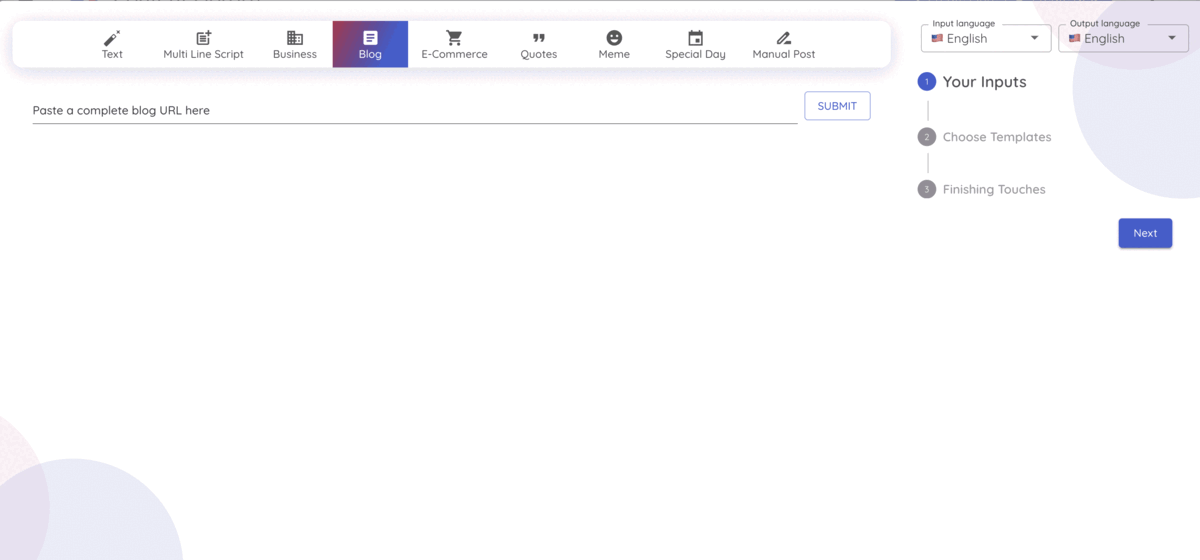
A Blog post is generated based on the URL you provide. The app will extract the blog article from the webpage you’ve provided and create three script versions you can choose from.
Once you confirm the script for your post, you can proceed to the “Choose Template” and “Finishing Touches” steps (see detailed description in the Text to Post section above).
A business post is generated based on information provided about your brand.
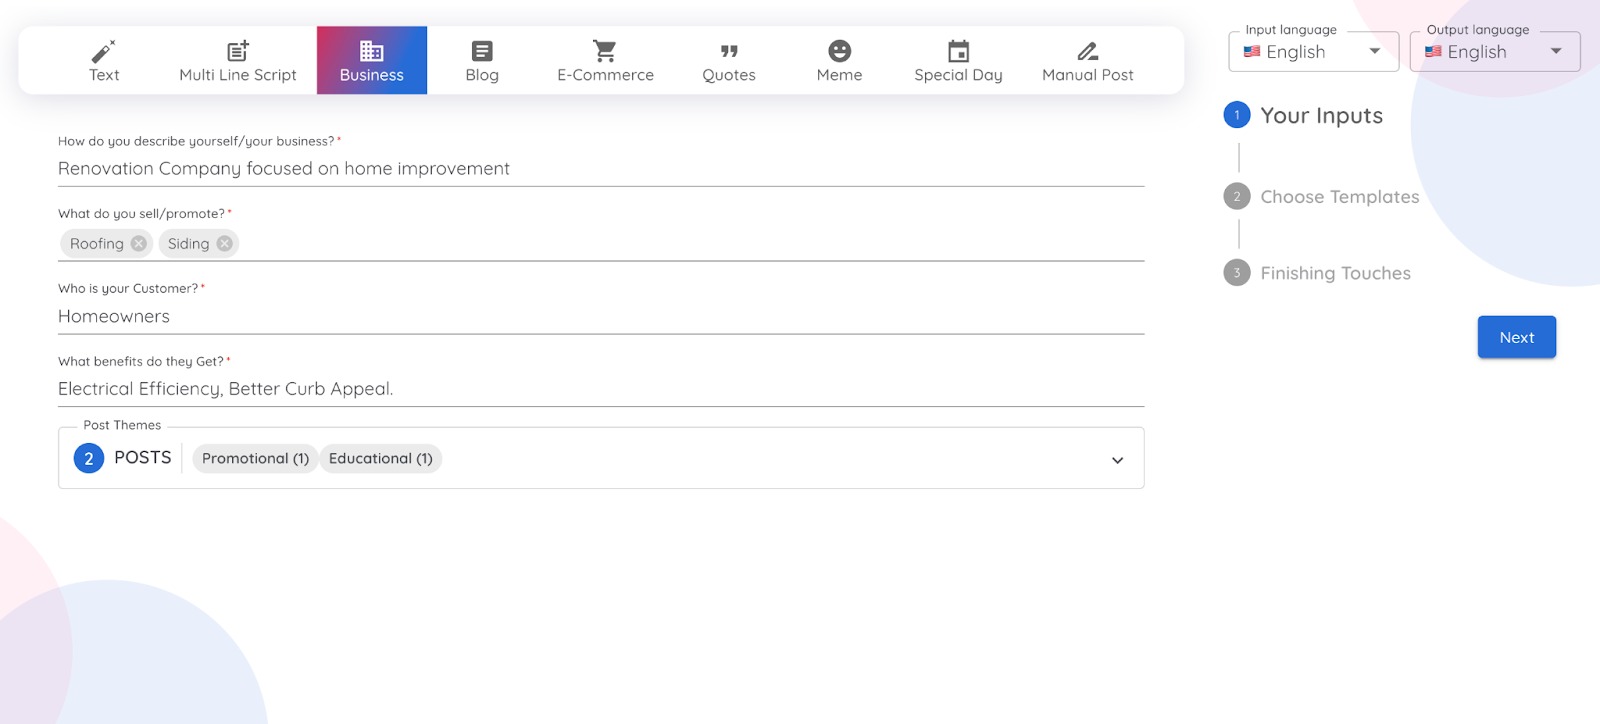
To create one, enter:
- A short business description
- Target customer
- Products, services, or relevant topics
- Your value proposition
- Post themes
A meme is created by AI based on a single line of text input.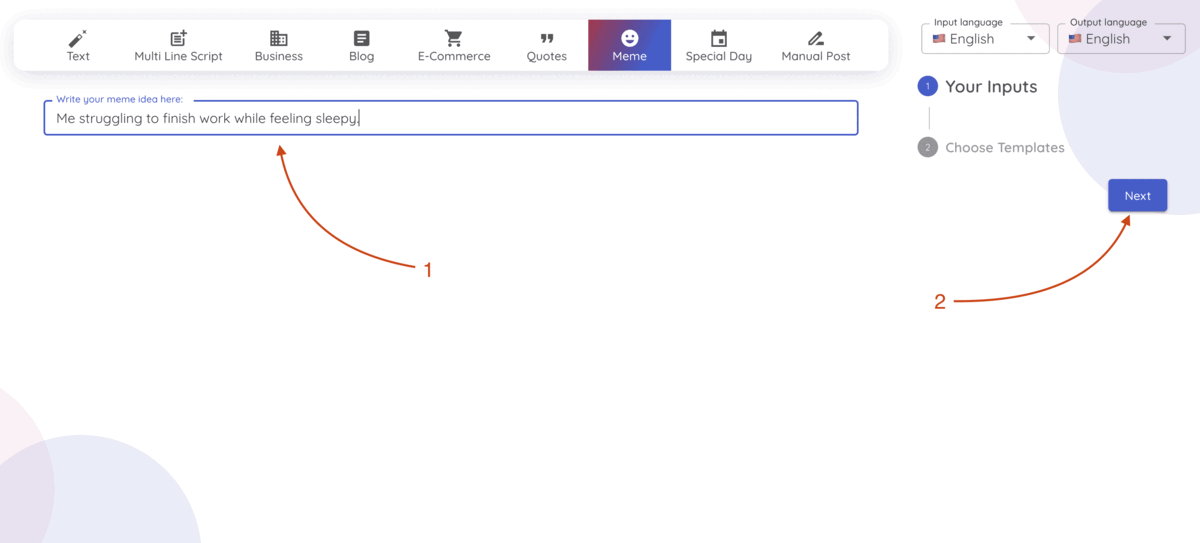
To create a meme, enter your description, choose a template you like (or let AI choose), and click Generate.
Special Day posts commemorate an event or holiday during the current month.
To create one, fill in your business information and click Next.
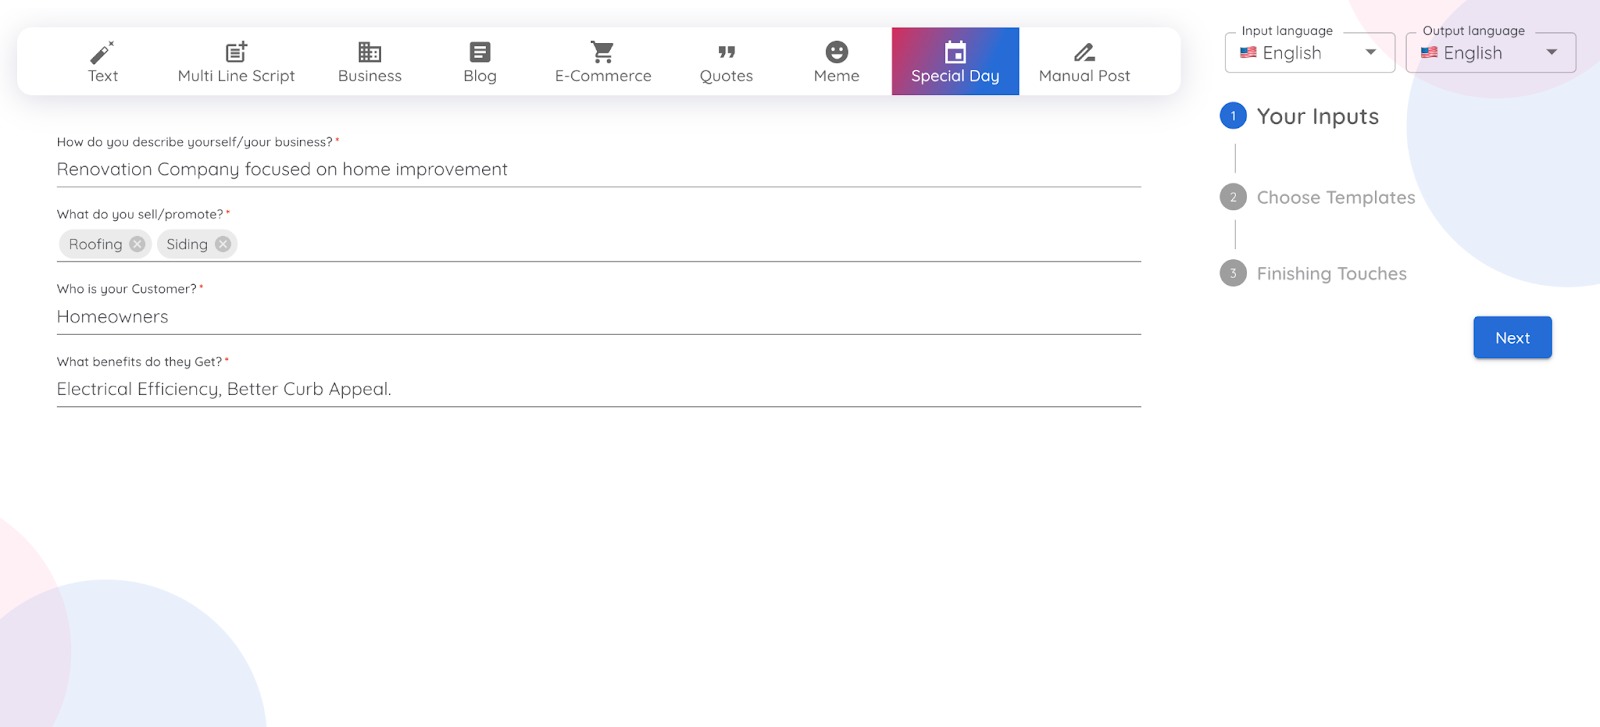
This month’s Special days’ templates will appear on the screen. Click on the one you want to post about.
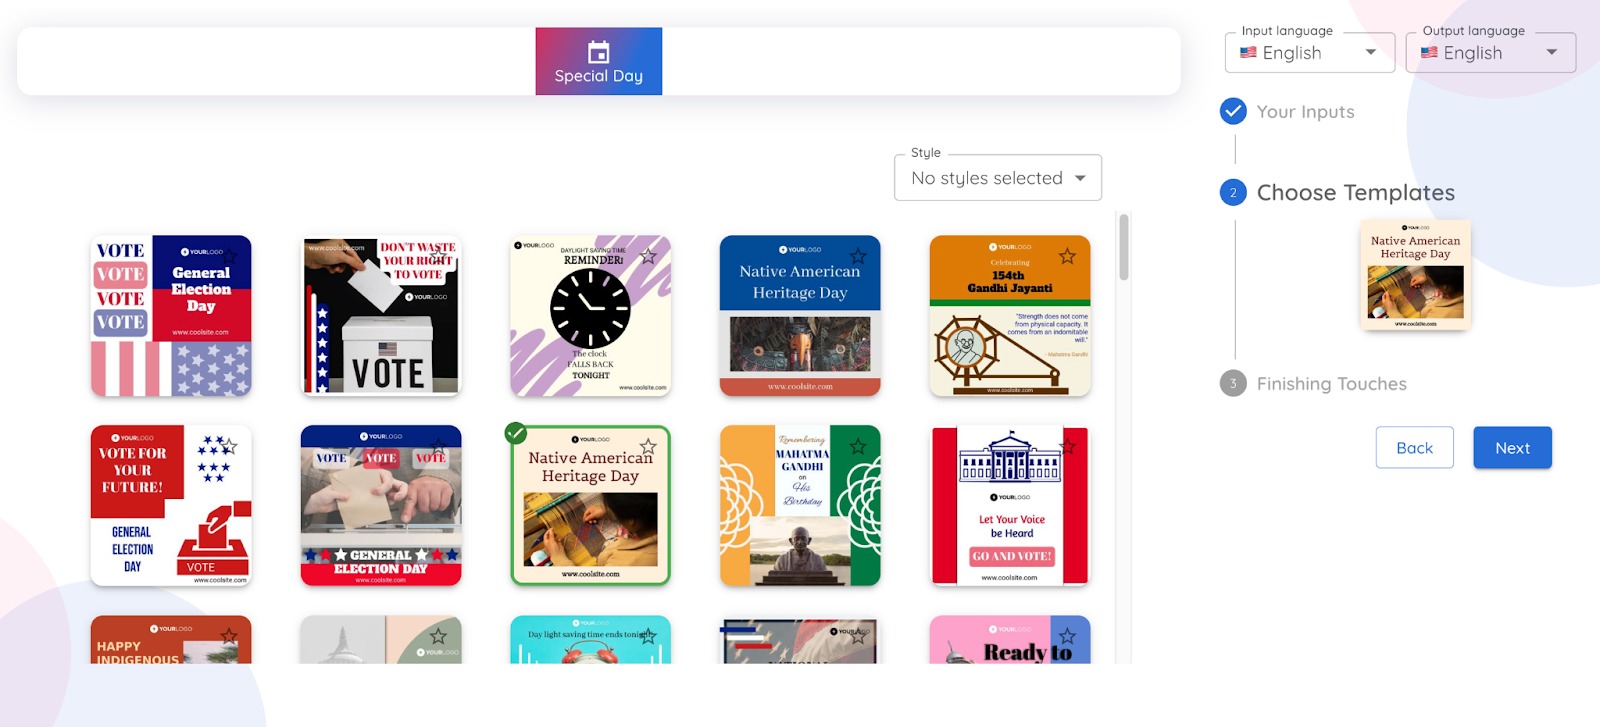
The last thing will be to add finishing touches by choosing a color palette, tone of voice, and assets to use in your post.
A topical quote from an influential figure. Use the drop-down to select a category and generate your post from our library of quotes, or write your own!
.gif)
.gif)
Create a post without the help of AI. Simply select your post type and template, then click “Generate.”
.gif)
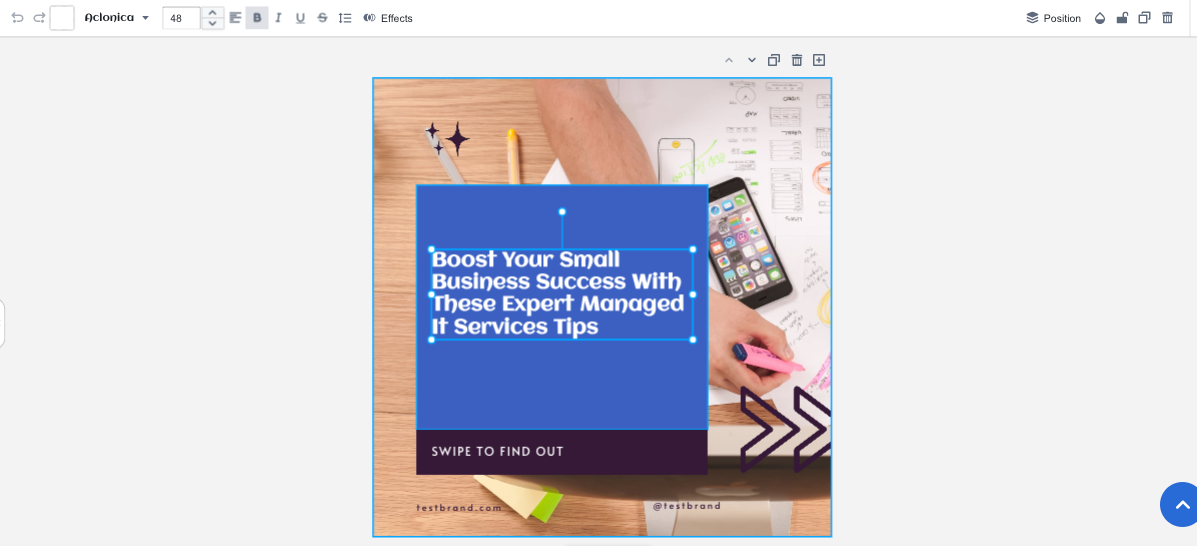
The app will automatically create a sample post in your content library using the template you selected. Click the “edit post” icon in your Content Library to update your post’s format, content, and design. 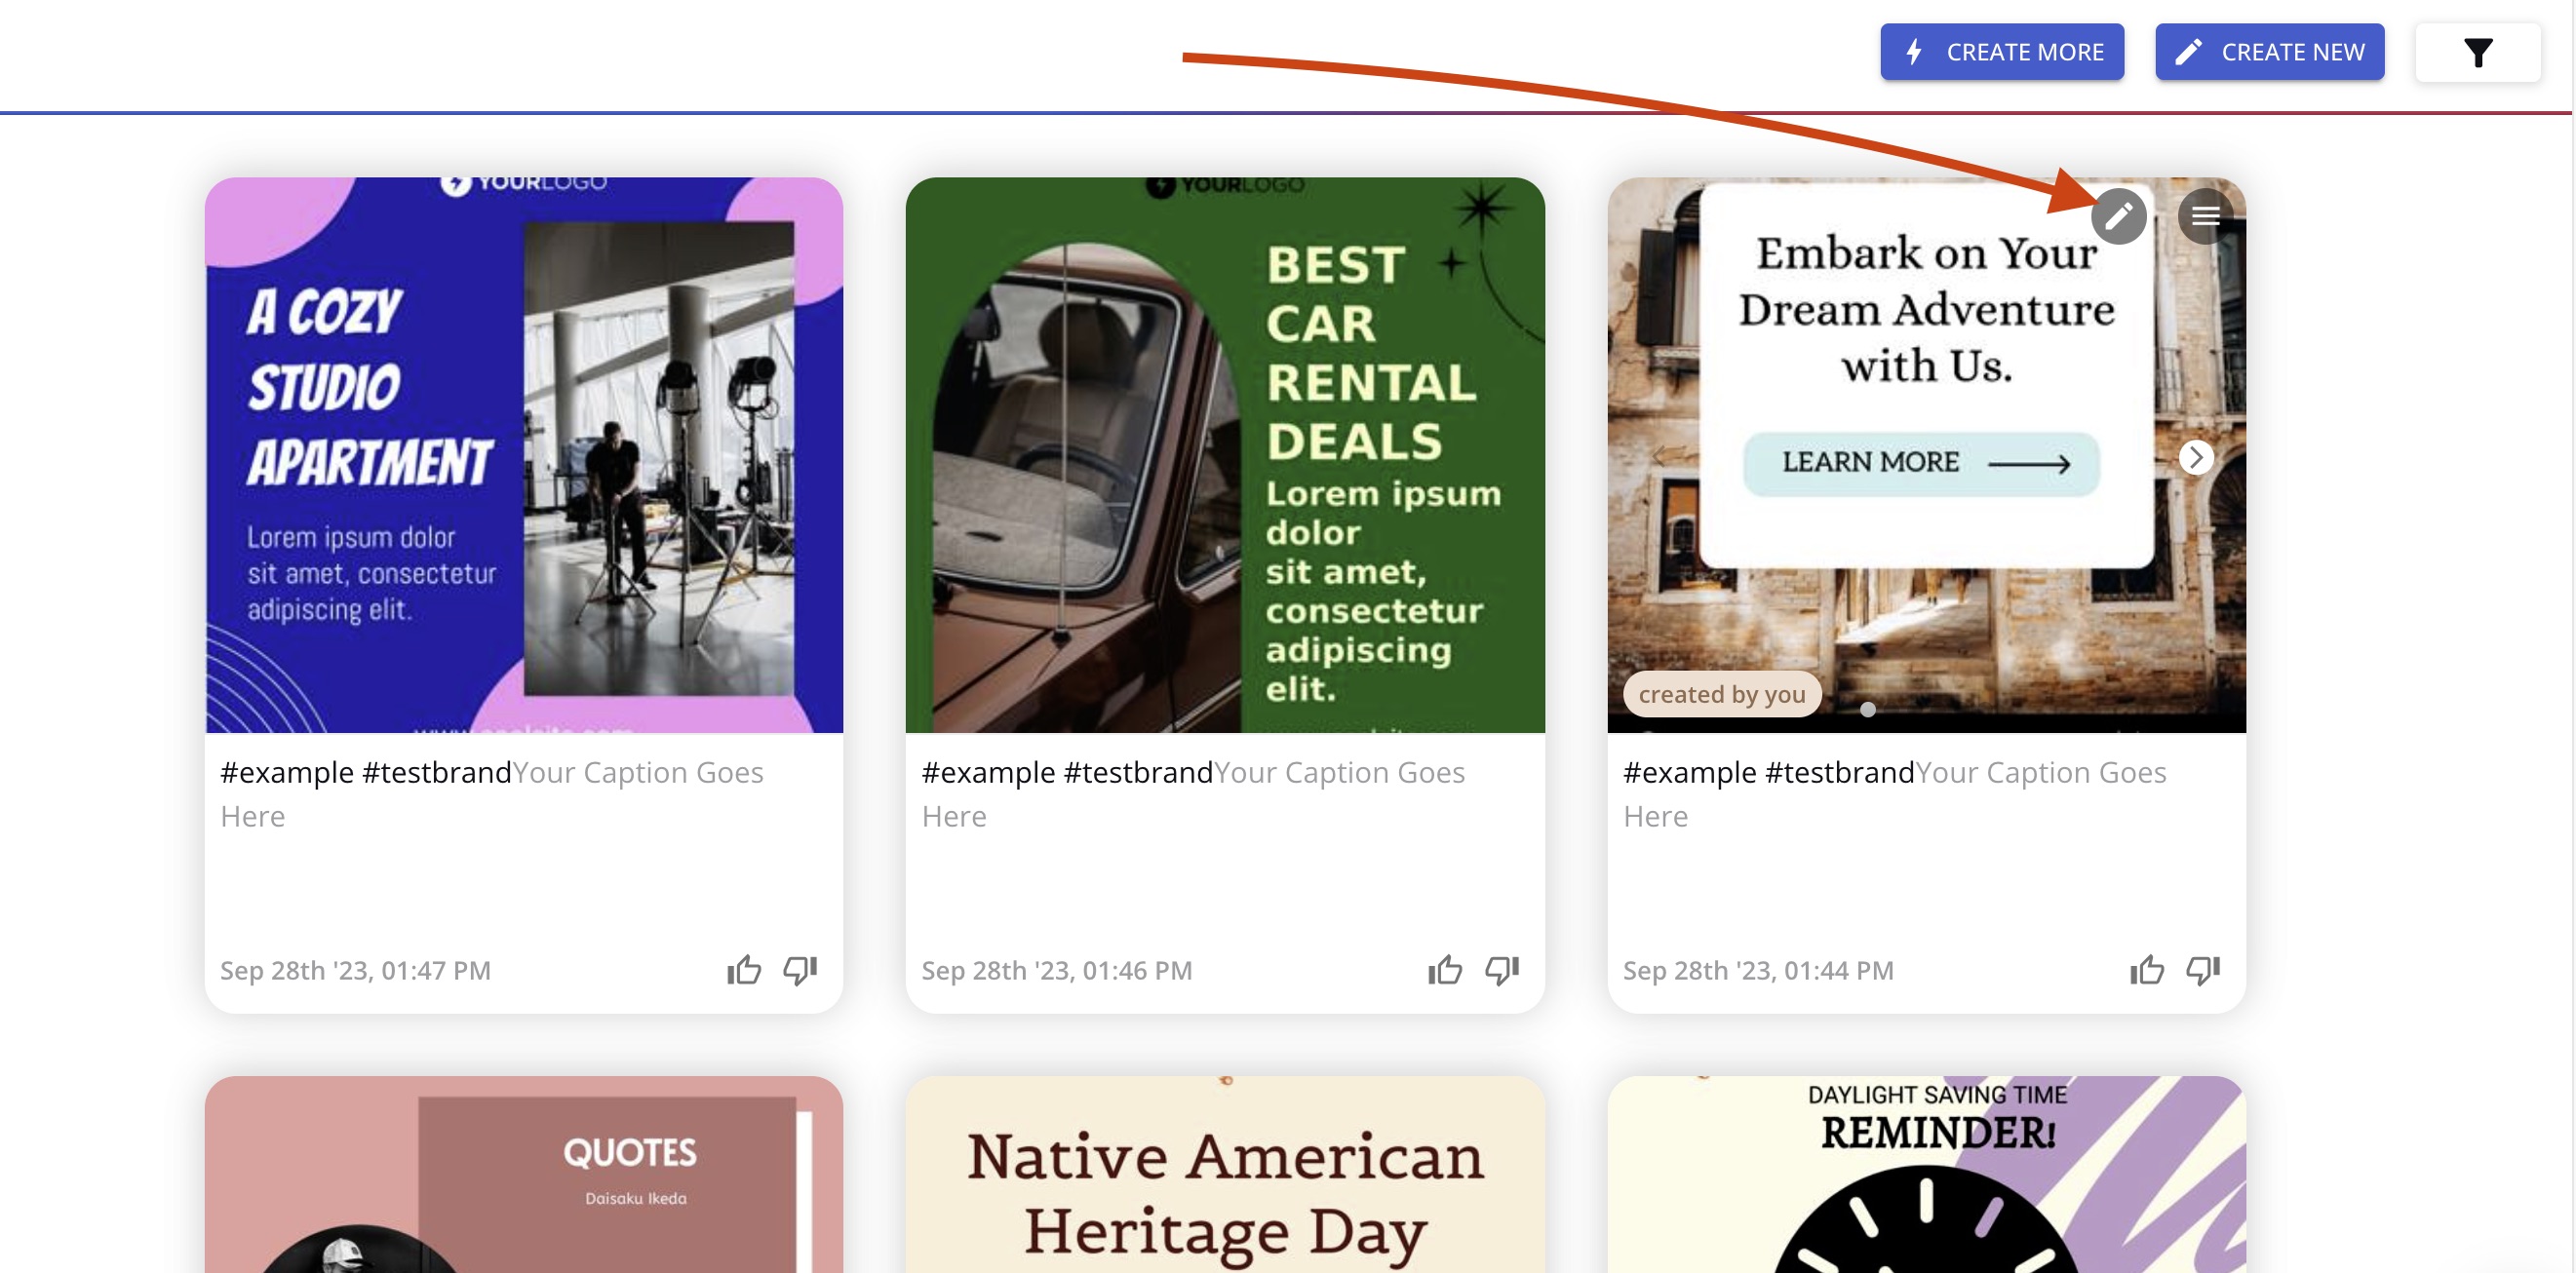
How To Edit Content
Every post created in AI Social Content Generator is editable. All you have to do is click the edit icon (a pencil, or  ) in the top right corner of that post in your Content Library.

The post editor is broken into three sections:
- Creatives: The images or video
- Captions: The text beneath your image or video
- Hashtags: The hashtags you’re targeting with that post
Important note: The post editor will look a little different based on the type of content you’re working on.
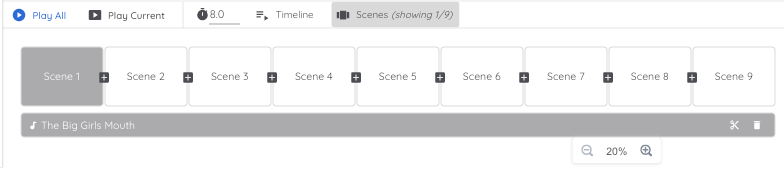
For example, if you’re editing a video, you’ll have a few additional options at the bottom of the screen:
- Play all: Plays the entire video
- Play current: Plays only the selected scene
- Scene time: What time the current scene plays in your video (e.g., at 8.5 seconds)
- Timeline: The order each element of your video is introduced
- Scenes: A list of all the scenes in your video
For videos and carousels, when editing your post, you’ll need to select the image or scene you want to change before adding any new elements.
When you’re finished editing, click the “Download” button in the top right corner. This will save your assets so that you can queue them for posting on your social platforms.
Creatives
The Creatives section is broken into seven tabs:
In the Design tab, you can select and edit your post template and color palette.
First, choose from our library of templates, or upload your own.
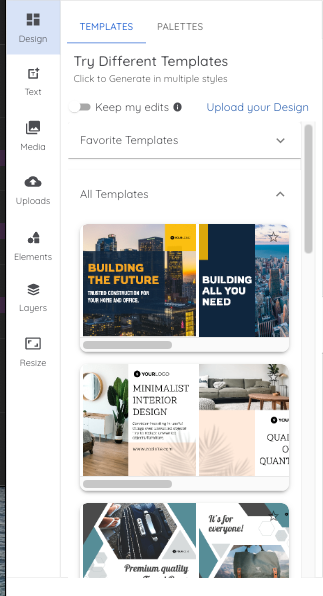
Then, click any element on your post to update it. For example, you could change the text, font, and colors or resize or reposition any element of the template.
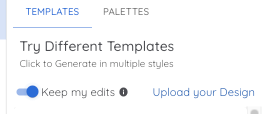
Pro Tip: If you want to carry all your edits to another template, make sure the Keep My Edits toggle is activated.
To swap your color palette, click Palettes, then select the color scheme you want to use.
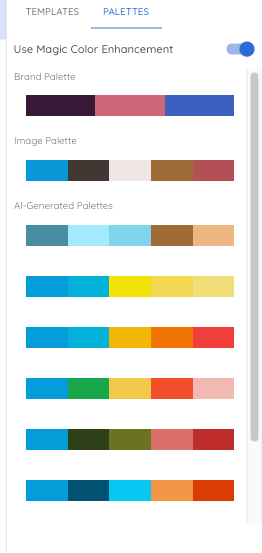
If you’ve set your brand colors, this will be the first option on the list. But you can also pull colors from the image itself or choose from a variety of AI-generated palette options.
Once you click on a palette, the app will automatically update the colors on your post. Not happy with how it turned out? Click on any element you want to re-color, and you can tweak it manually.
In the text tab, you can add new text elements to your post.
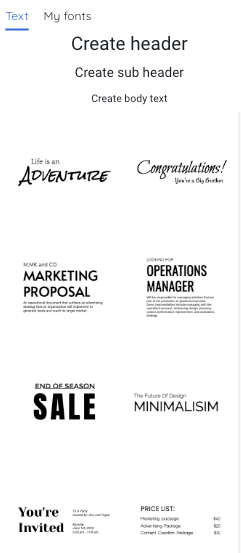
If you’re editing a carousel or video, start by selecting the scene or image you want to add text to in the post editor.
Next, in the “Text" section, click on any text style from the menu, and it will appear in the center of your post. Then, you can click and drag to reposition it, change the colors, and update the text itself.
However, this screen does not change the style of text that was already part of your template. So if you need to make changes to that, you’ll have to do it manually.
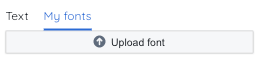
In the “My fonts” section, you can upload custom fonts to use in your brand’s content. If you’ve already uploaded custom fonts, you can find them here.
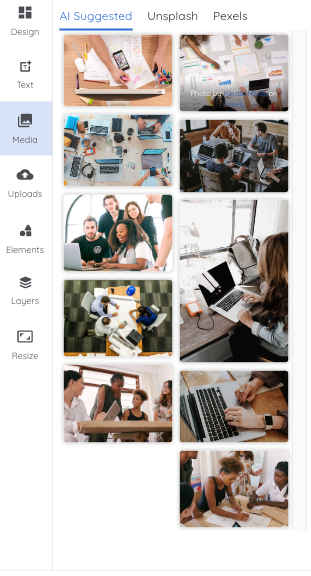
Add or change images in your post on the Media tab.
Here, you have three options:
- AI Suggested
- Choose from the Unsplash library
- Choose from the Pexels library
To add a new image to your post, first, find it in the appropriate section. For example, if you want to add an Unsplash image, click Unsplash, scroll until you find the image, and click on it.
By default, the new image will appear in the center of your post. Click on it (in the post itself) to resize and reposition it.
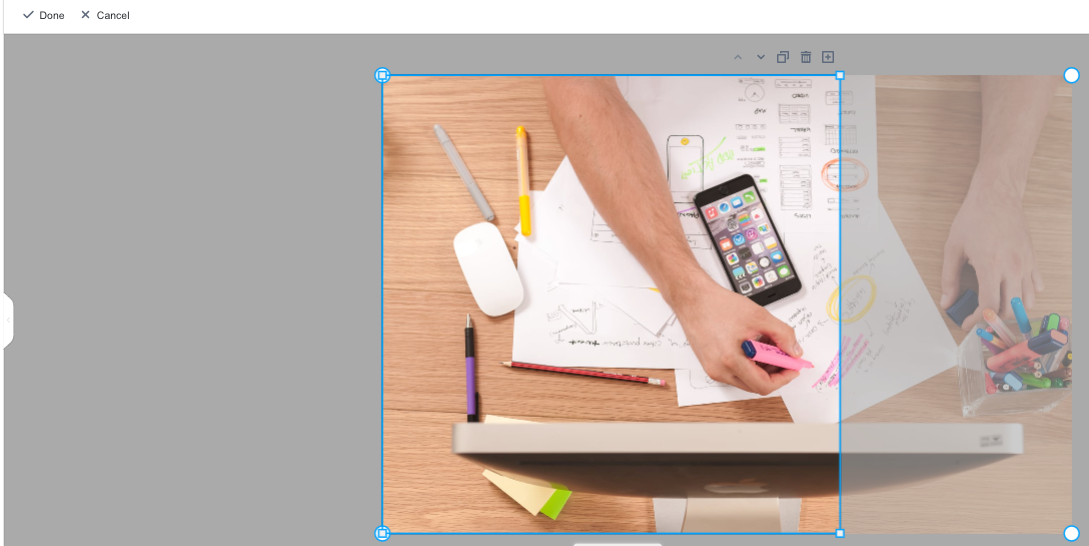
You can also swap out an existing image. To do this, first, click on the image element you want to change. Then, after you’ve selected it, use the image library menu to the left to find a new image. Once you click on a new image, it will replace the old one.
If you’re editing a video, you’ll also be able to select from a library of video and audio content from Pexels.

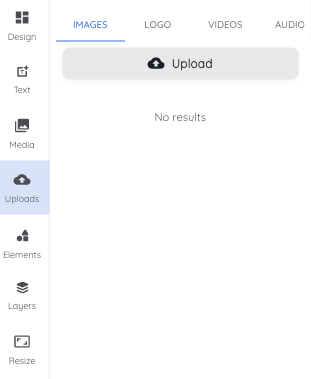
The Uploads tab houses all the media content you’ve manually uploaded, including images, logos, video, and audio.
The Images section includes all image types, such as photography or illustrations. Click “Upload” to add to your manually curated image library.
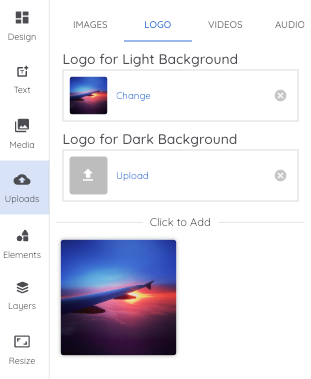
The Logos section is where you can find light and dark versions of your brand logo. If you haven’t yet uploaded your logo, you can do so here by clicking the appropriate “Upload” button (e.g., for light vs. dark backgrounds).
Video and audio are only visible if you’re editing a video post. Select those sections to see the content you’ve already uploaded. To add to your personal library, click “upload.”
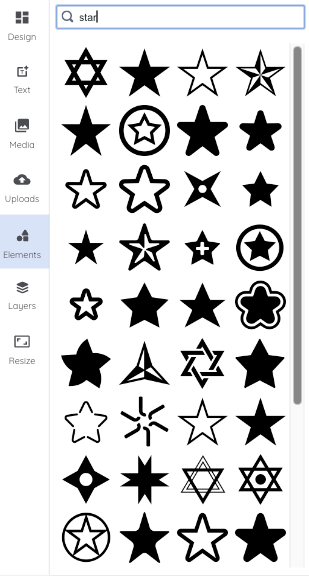
On the Elements tab, you can add graphical elements (e.g., shapes) to your post.
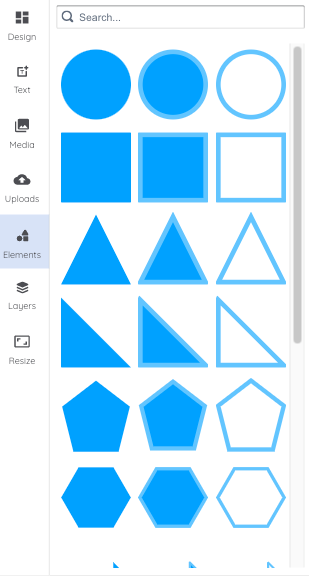
By default, an array of options will be suggested to you. However, if you want something different, just type it into the search bar, and a variety of matching options will appear.
On the Layers tab, you can see all elements that have been added to your post in order. In other words, at the top of the list is the topmost element. At the bottom of the list is your bottom layer—probably your background.
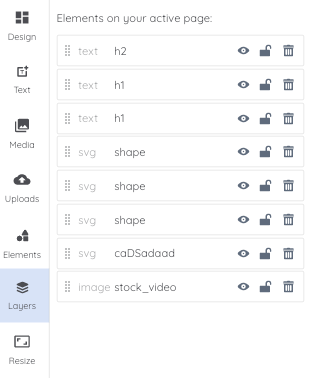
To bring a layer forward, click and drag it in the list into the position you want. For example, to bring an image forward, drag it up on the list.
For each layer, you also have three icons:
- Eye: Show or hide that layer
- Lock: Prevent that layer from being updated (such as changing the font or color)
- Trash: Get rid of that layer
Click on each icon to activate or disable it.
On the Resize tab, you can select your post type and platform, and the app will adjust your content to match those specifications.
For example, if you’re working on a square post (e.g., an Instagram post) but decide you’d rather post it as an Instagram story, it will automatically reformat it into a rectangle:
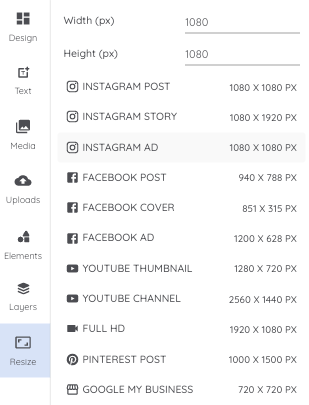
Post sizes include:
- Instagram post
- Instagram story
- Instagram ad
- Facebook post
- Facebook cover
- Facebook ad
- YouTube thumbnail
- YouTube channel
- Full HD
- Pinterest post
- Google Business
Need something different? Just type your preferred height and width, and the post will resize accordingly.
Captions
The Captions section allows you to write or generate your post caption.
To write your caption manually, just type directly into the text field in the middle of the screen.
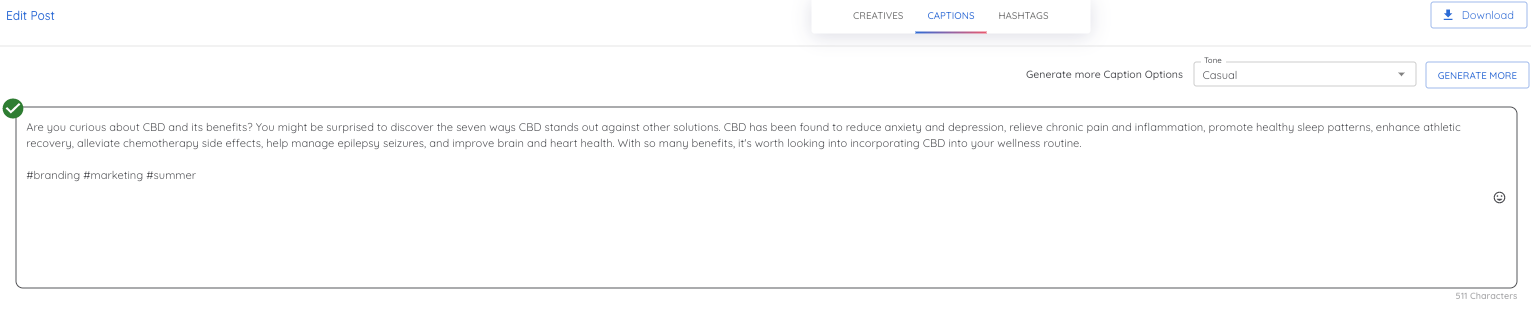
To generate a caption with AI, first use the drop-down menu to select your preferred tone. Then, click “Generate more.” An additional text field will appear beneath the first one.
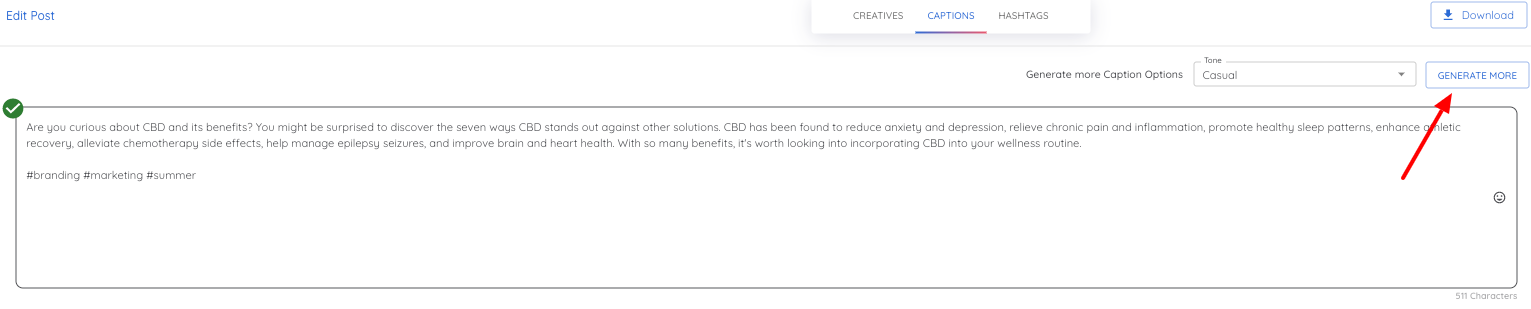
Next, select the caption you want to use by clicking on it. A green check mark will appear beside the one that’s currently selected.
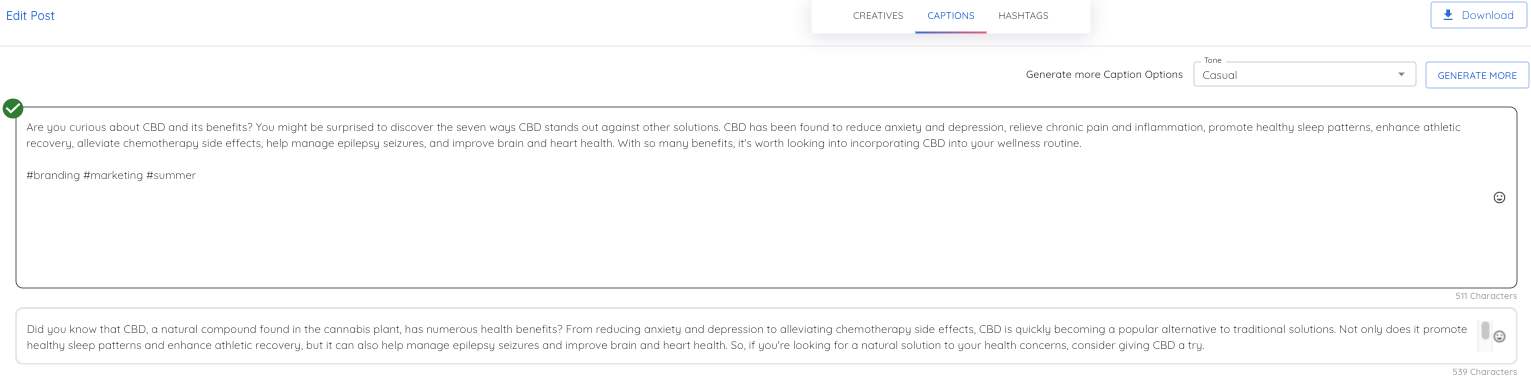
Then, you can edit the text directly or add emojis by clicking on the smiley face icon.

Hashtags
In the Hashtags section of the Post Editor, you can choose the hashtags you want to target with your post.
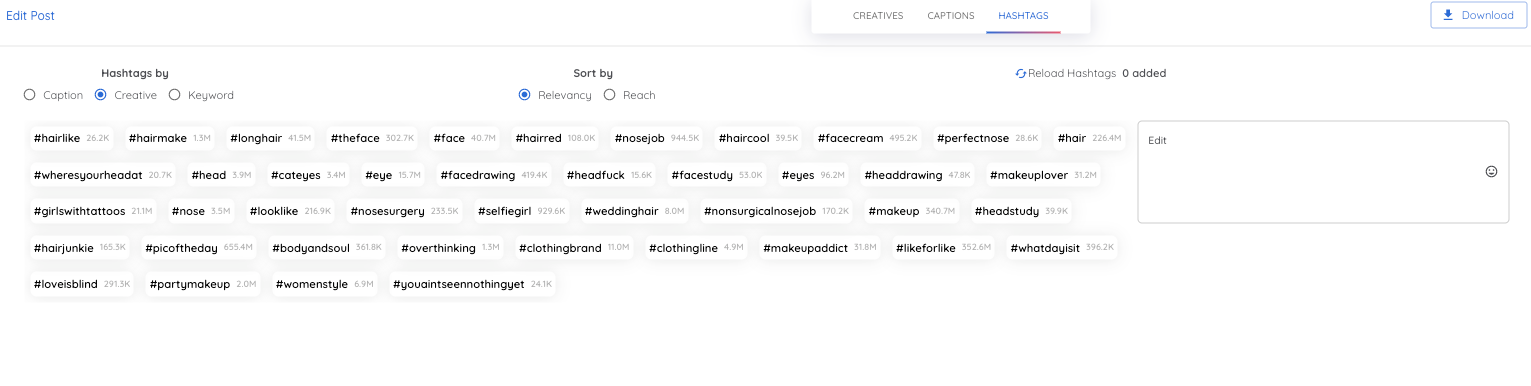
You have two options:
- Choose an AI-suggested hashtag
- Type your own hashtag
AI-suggested hashtags are compiled in the middle of the screen. The tool can suggest hashtags based on:
- Caption
- Creatives
- Content
Click the radio button beside the one you prefer.
Additionally, sort your hashtags by relevancy or reach by clicking on the appropriate option.
To select a hashtag, click on it. It will then appear in the editing pane to the right, where you can make changes if necessary.
To enter your own hashtag manually, simply type it directly into the editing pane.
Competitor Analysis
The Competitor Research page analyzes your top social media competitors, uncovering key details like:
- The content themes they post about more often
- Which topics and post types earn the highest engagement
- Which hashtags they target
- Their top-performing posts
The first time you visit this page, a window will appear in the center of the screen. Here, you’ll need to enter the Instagram and/or Facebook profiles of one of your competitors.
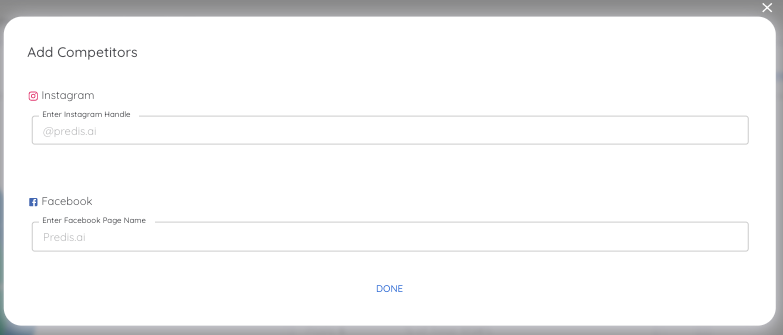
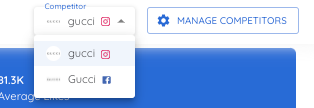
To change this later or add additional competitors, click “Manage Competitors” in the top right corner of your screen, and you will return to this window.
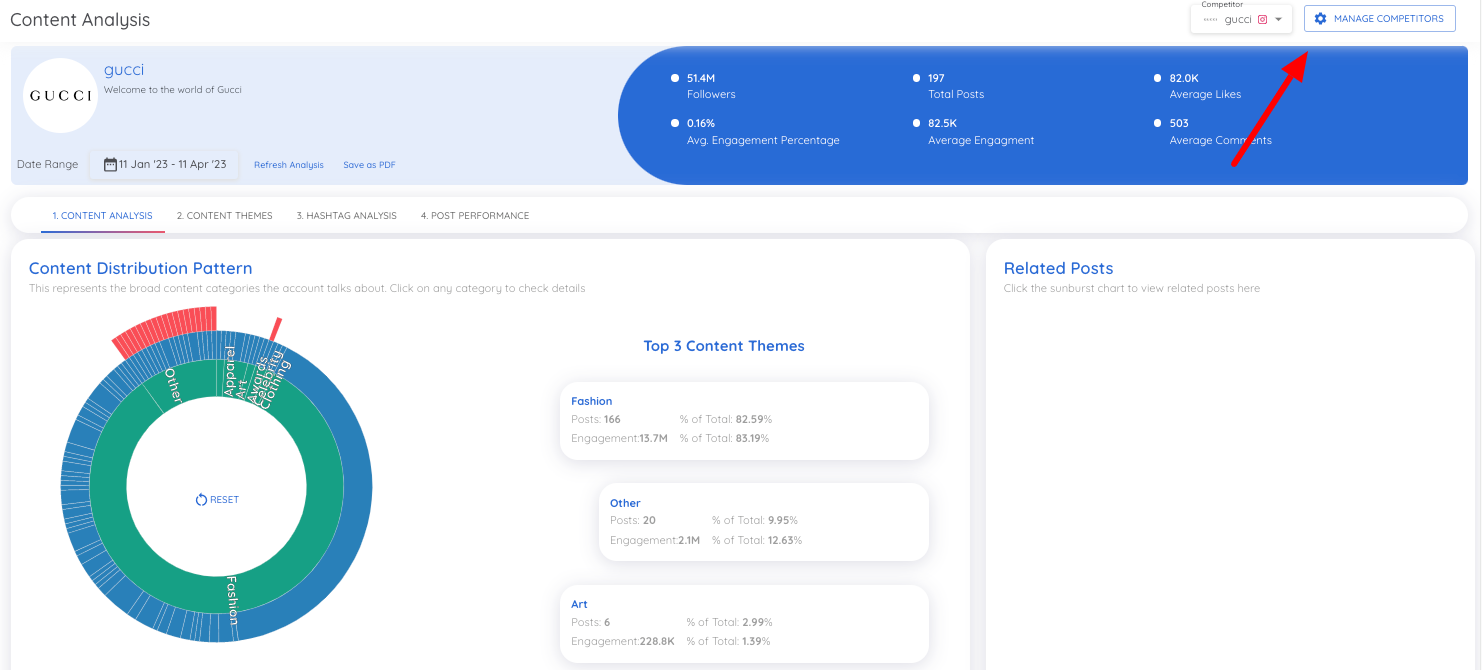
The Competitor Analysis page analyzes one social profile at a time. To toggle between competitor profiles, expand the competitor drop-down menu and click on the one you want to analyze.
Header
The header section of the Competitor Analysis page shows basic information about your competitor’s social profile, including:
- Their handle and default image
- Their follower count
- Their post count
- Average number of likes
- Average engagement percentage
- Average number of comments

Additionally, it’s here that you can tailor your view.
First, Date Range shows the period you’re currently analyzing. To change it, click on the dates and select a new range from the calendar. The page will automatically refresh to include this new information.
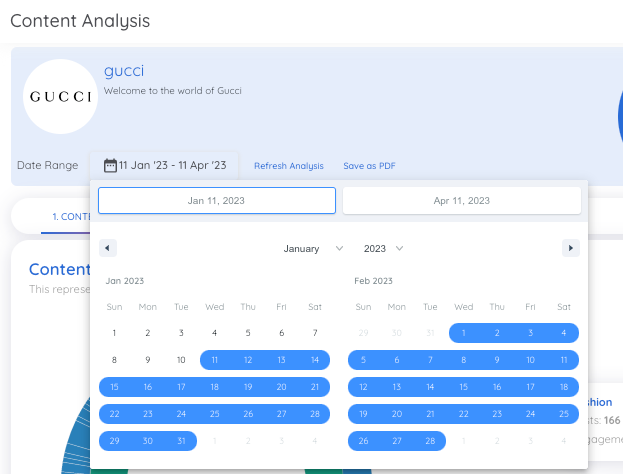
Second, the Refresh Analysis button refreshes the page so that you’re viewing the most up-to-date data.
Finally, click “Save as PDF” to download a PDF of the report.
Content Analysis
The Content Analysis tab is a high-level analysis of that social profile’s overall content trends. Here, you’ll find charts analyzing:
- The content themes they post about most often
- The themes that draw the most engagement from their audience
- The content they post about most often, broken down by post type
- The post topics that draw the most engagement for each post type
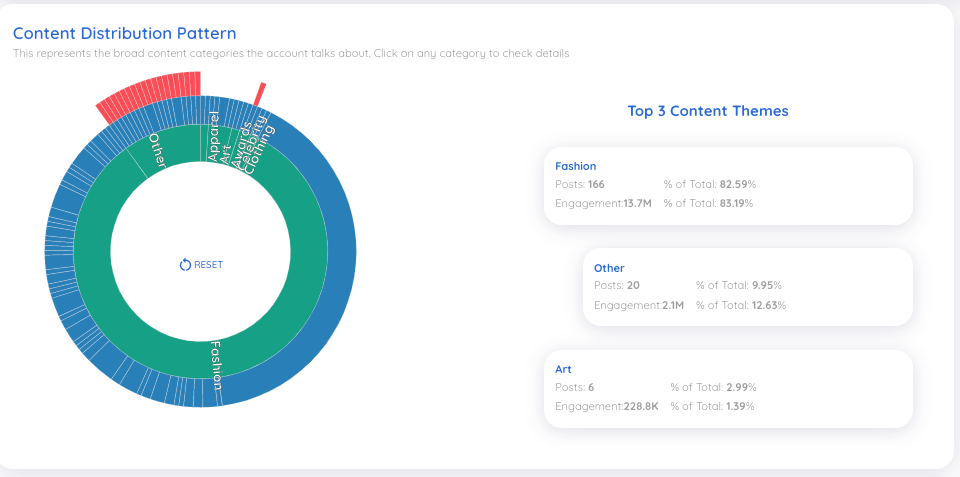
To see example content related to any of these post types or themes, just click on that segment of the graph, and posts will appear on the right.
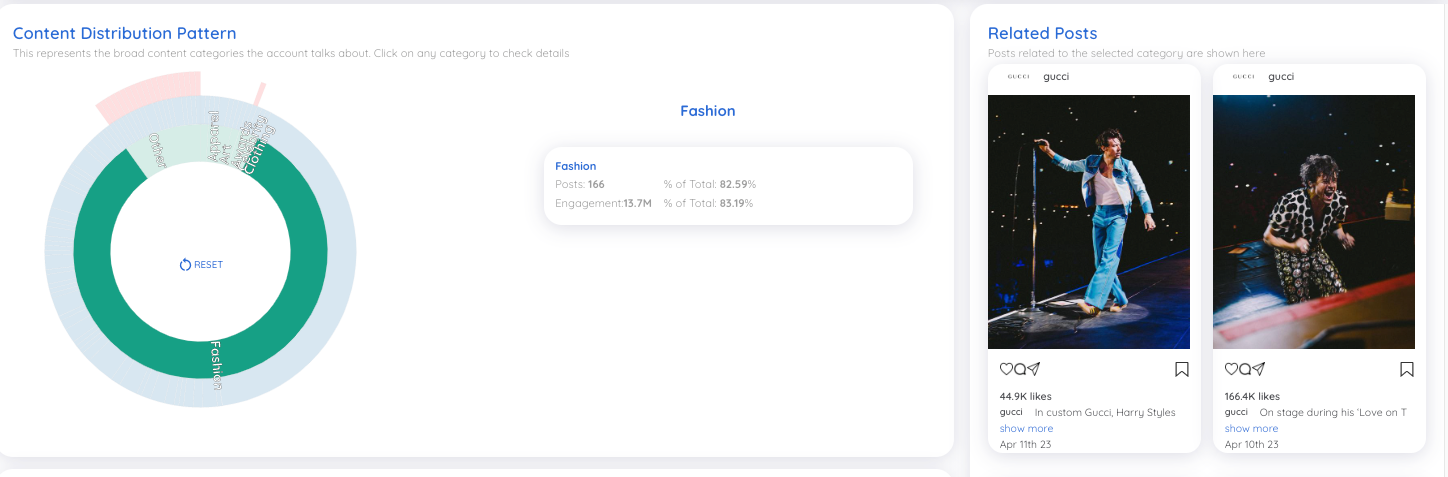
Click on that segment again to return to the original view.
Content Themes
The Content Themes tab shows analyses of post topics in greater detail.
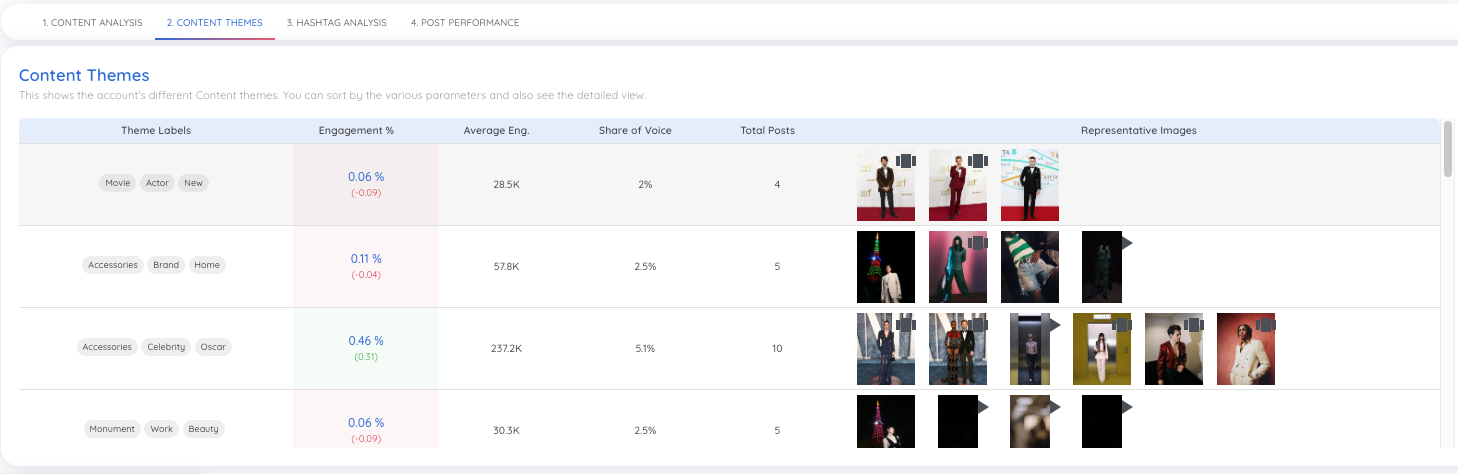
Here, the AI groups related themes that overlap in their content. These themes are described by AI with theme labels, which encapsulate several related hashtags. If you click on a Theme Label, you’ll be directed to the Hashtag Analysis tab, which will only show data for the hashtags included in that label.
For each set of themes, the tool will tell you how that content performed. This includes engagement percent, average engagement, share of voice, and number of posts included in that set.
Then, in the “Representative Images” column, you’ll see images of the posts themselves. Clicking on an image will open the live post in a new window.
You can sort this report by clicking on the following column headers:
- Engagement %
- Average Eng.
- Share of Voice
- Total Posts
Hashtag Analysis
The Hashtag Analysis tab takes a deep dive into the hashtags your competitor is targeting on that social platform.
Here, you have three widgets.
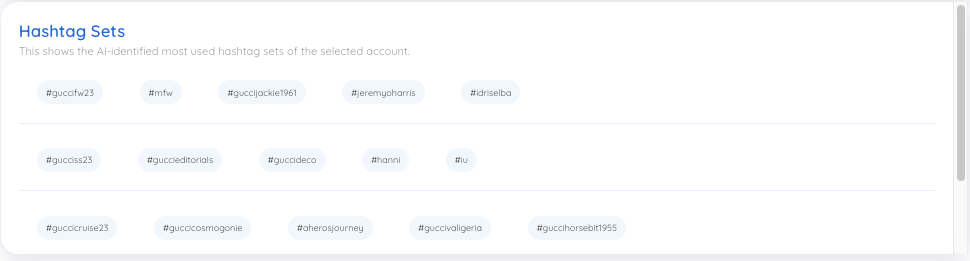
First, Hashtag Sets are groups of related hashtags identified by AI, which are frequently used together.
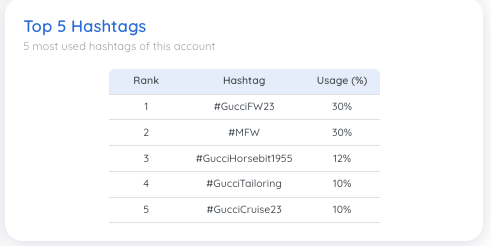
Second, the Top 5 Hashtags widget identifies the five most frequently used hashtags based on the percentage of posts they appear on.
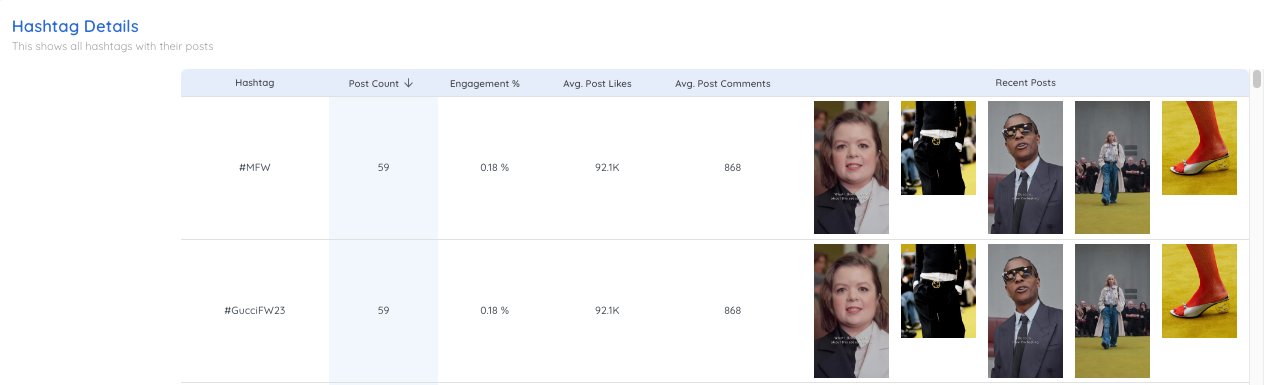
Finally, Hashtag Details breaks down individual hashtags, showing you:
- The number of posts it was used on
- The Engagement % earned by those posts
- The average post likes and comments for posts using that hashtag
- Recent posts using that hashtag
Post Performance
The Post Performance tab analyzes the performance of individual posts and post types, regardless of content theme.
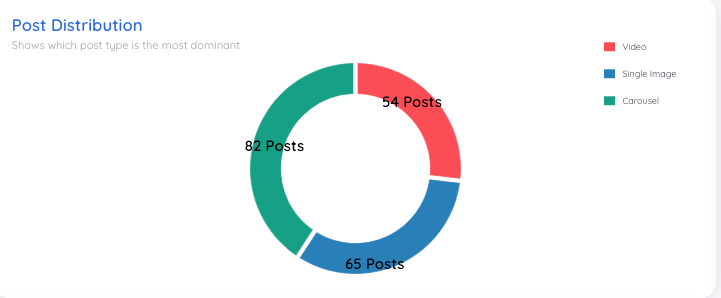
First, Post Distribution breaks down the number of posts by type, including:
|
|
|
|
|
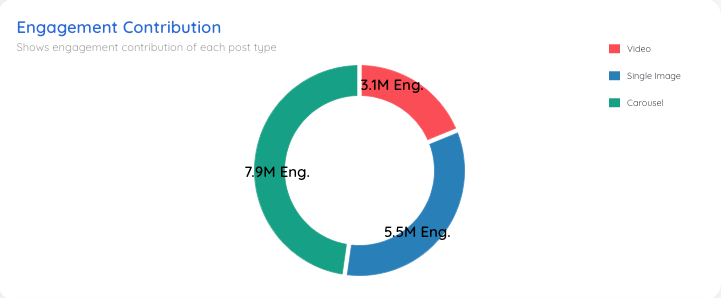
Next, Engagement Contribution shows how much engagement each of the aforementioned post types earned.
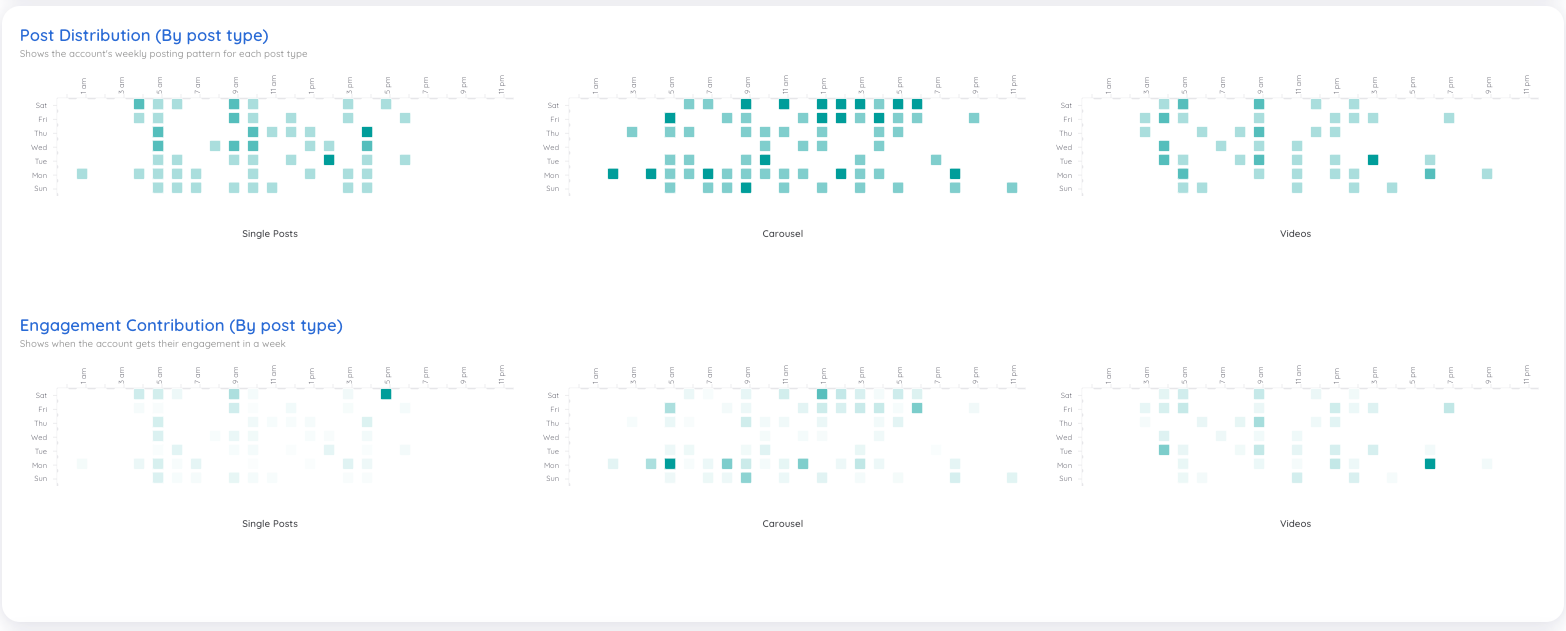
Post Distribution shows when they post their content each week.

The vertical axis shows the day of the week, and the horizontal axis shows the time of day. Posts are denoted by a colored block. A lighter hue indicates fewer posts, while a darker hue indicates more. Place your cursor over a block to see the number of posts at that time.
Engagement Contribution works in a similar way, showing the time and day that the account’s posts earn the most engagement. Similar to Post Distribution, a darker hue indicates more engagement at that time.
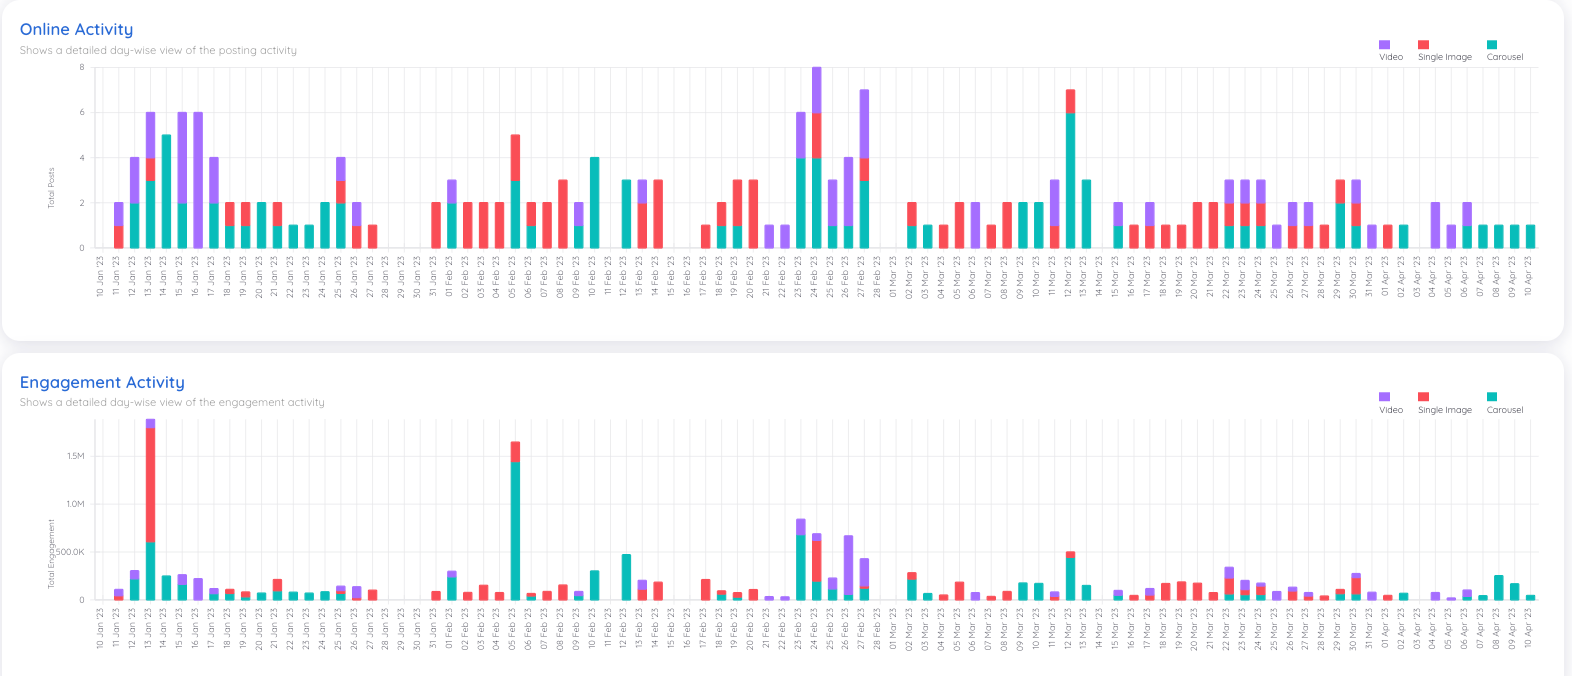
The Online Activity chart breaks down posting activity by date and post type. It shows how many posts were made each day, color-coded by type. Similarly, Engagement Activity depicts engagement by day, color-coded by post type.
The Post Distribution (by post type) and Engagement Contribution (by post type) widget functions the same way as the above charts, Post Distribution and Engagement Contribution. However, these charts each look at a single post type rather than viewing all content holistically.
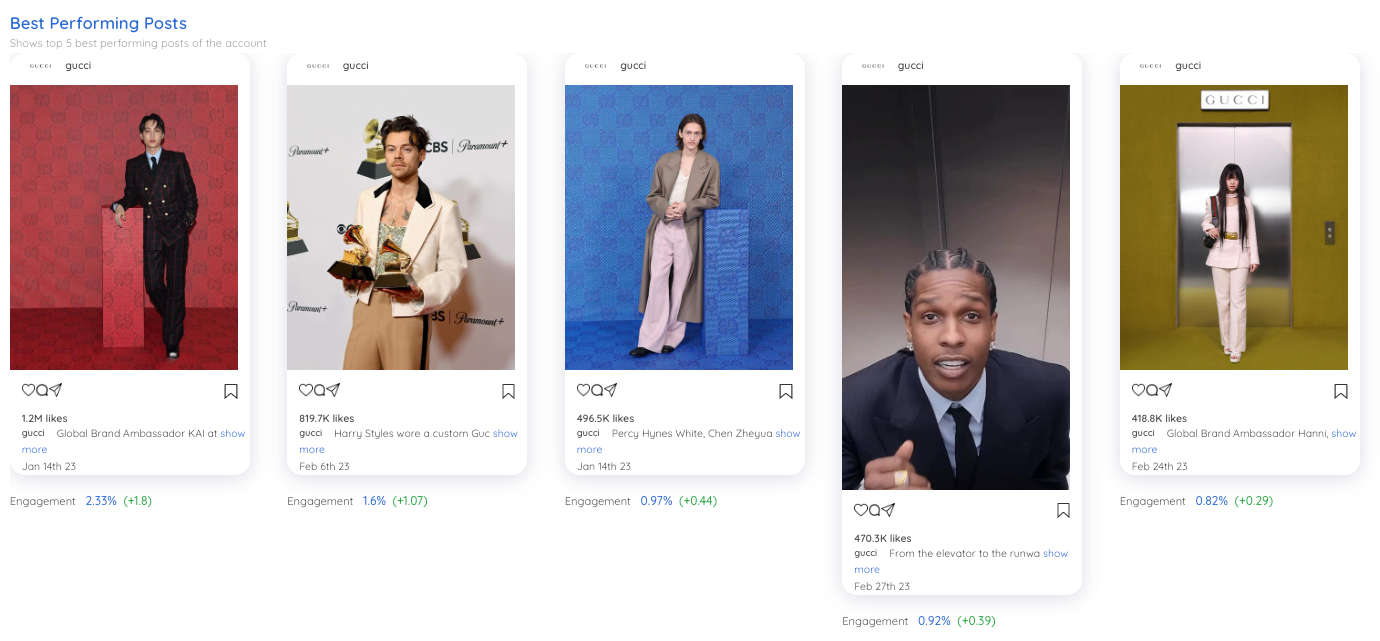
Best Performing Posts highlights the top five posts by engagement currently on the account.
Finally, All Posts lists everything currently posted to the account, including:
- Post creatives
- Caption text
- Engagement %
- Likes
- Comments
- Date published

Brand Management
The Brand Management page is where you can set up your brand’s style and preferences.
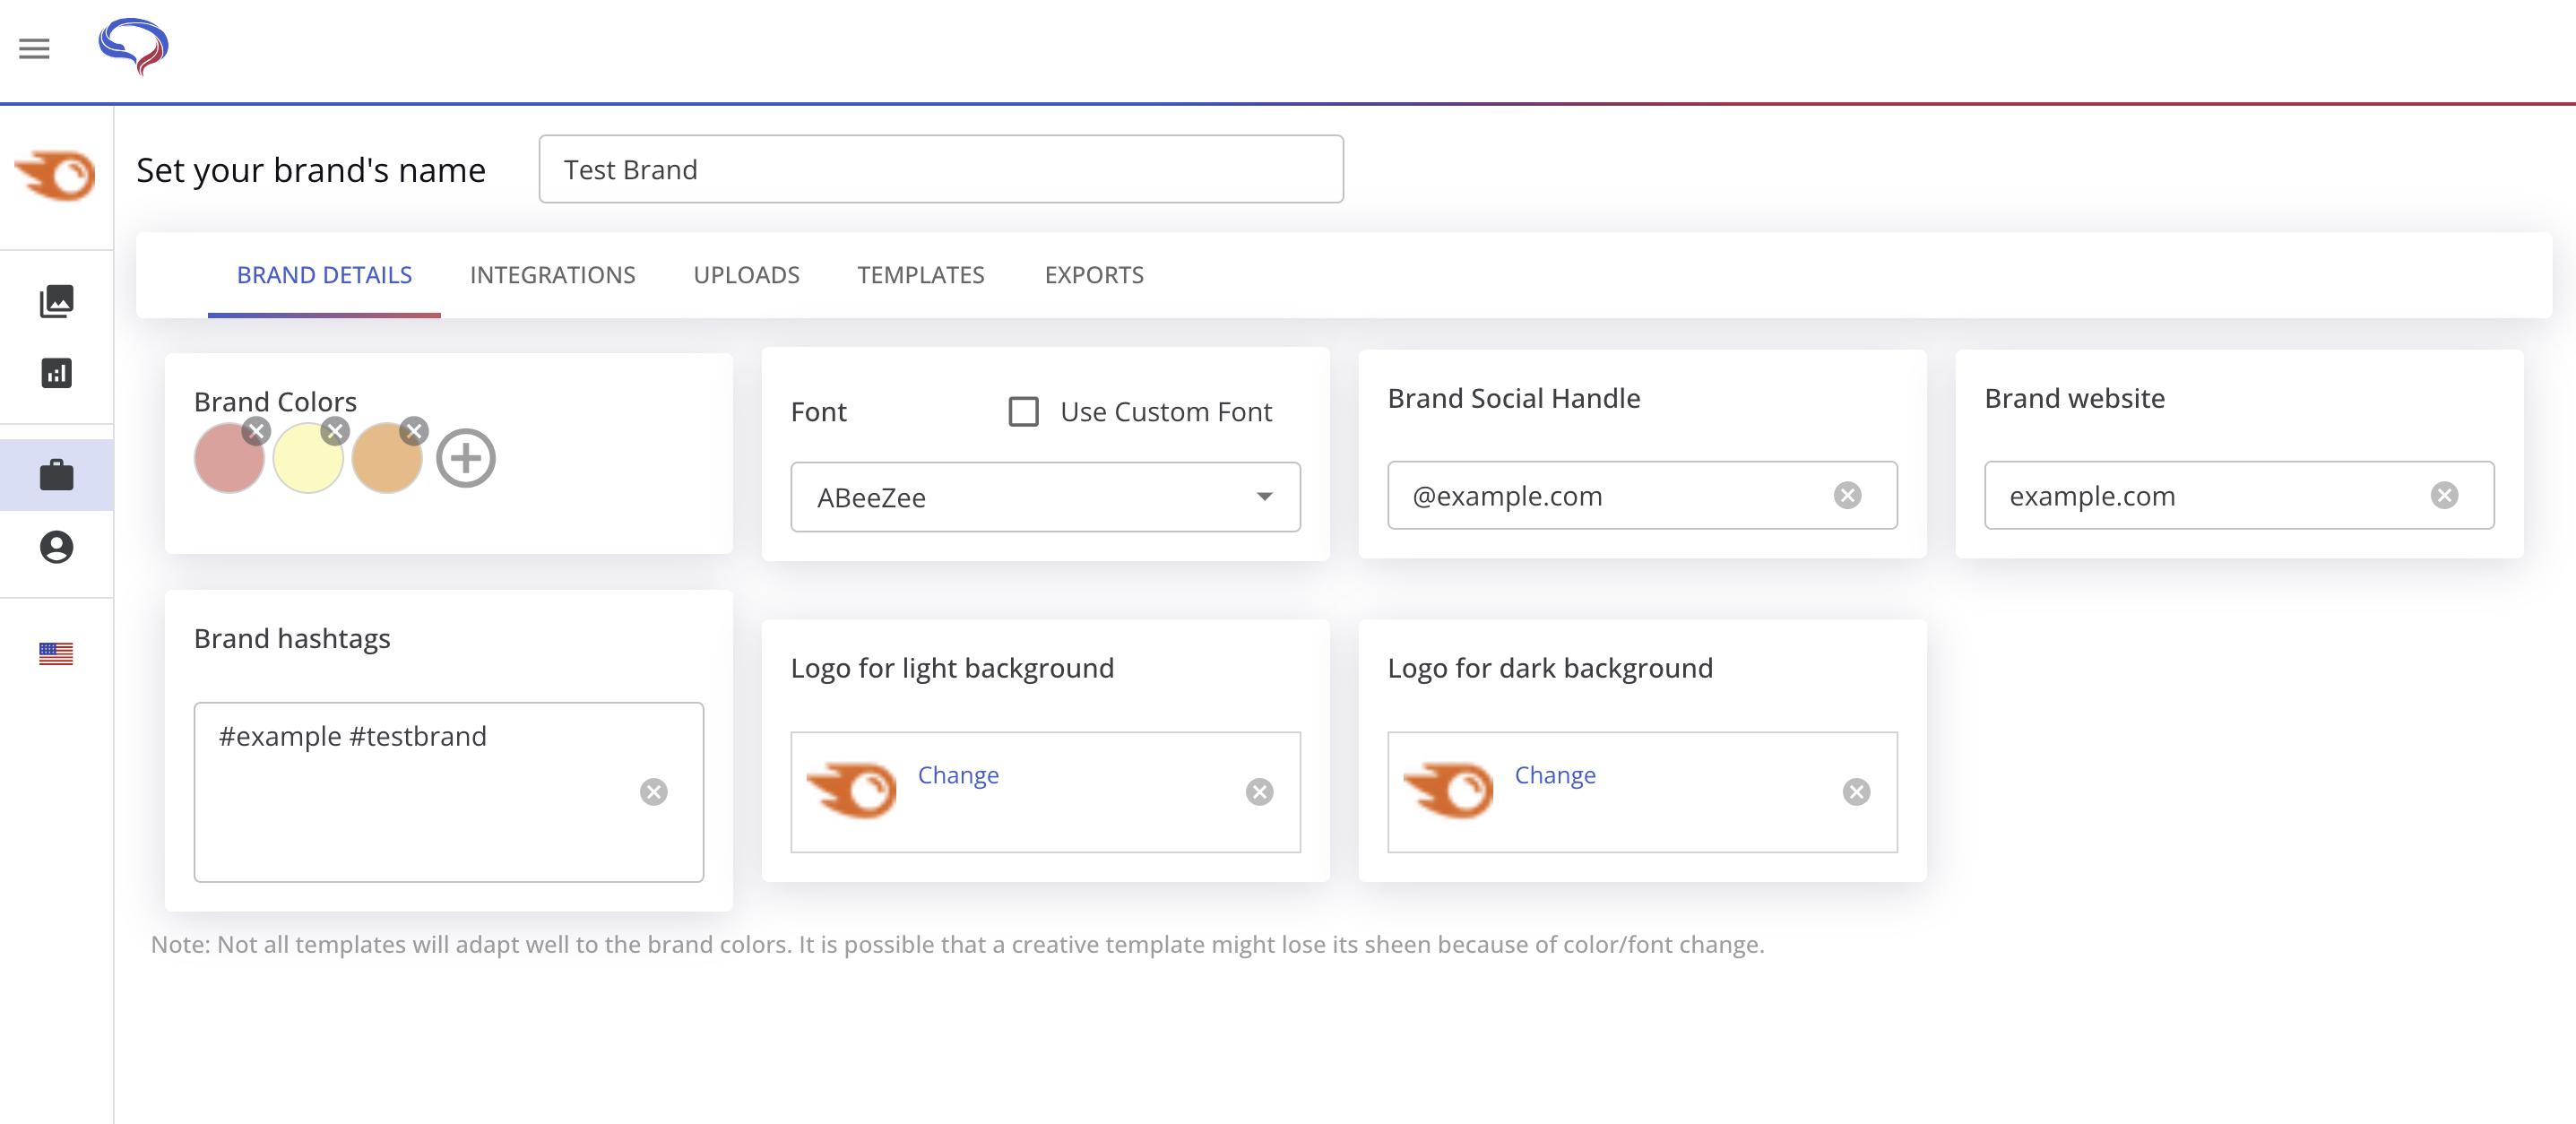
On the Brand Details tab, you can specify:
- Your brand colors
- Your preferred font (including custom fonts)
- Your social handle and website
- Your brand’s main hashtags
- Logos for use on light and dark backgrounds
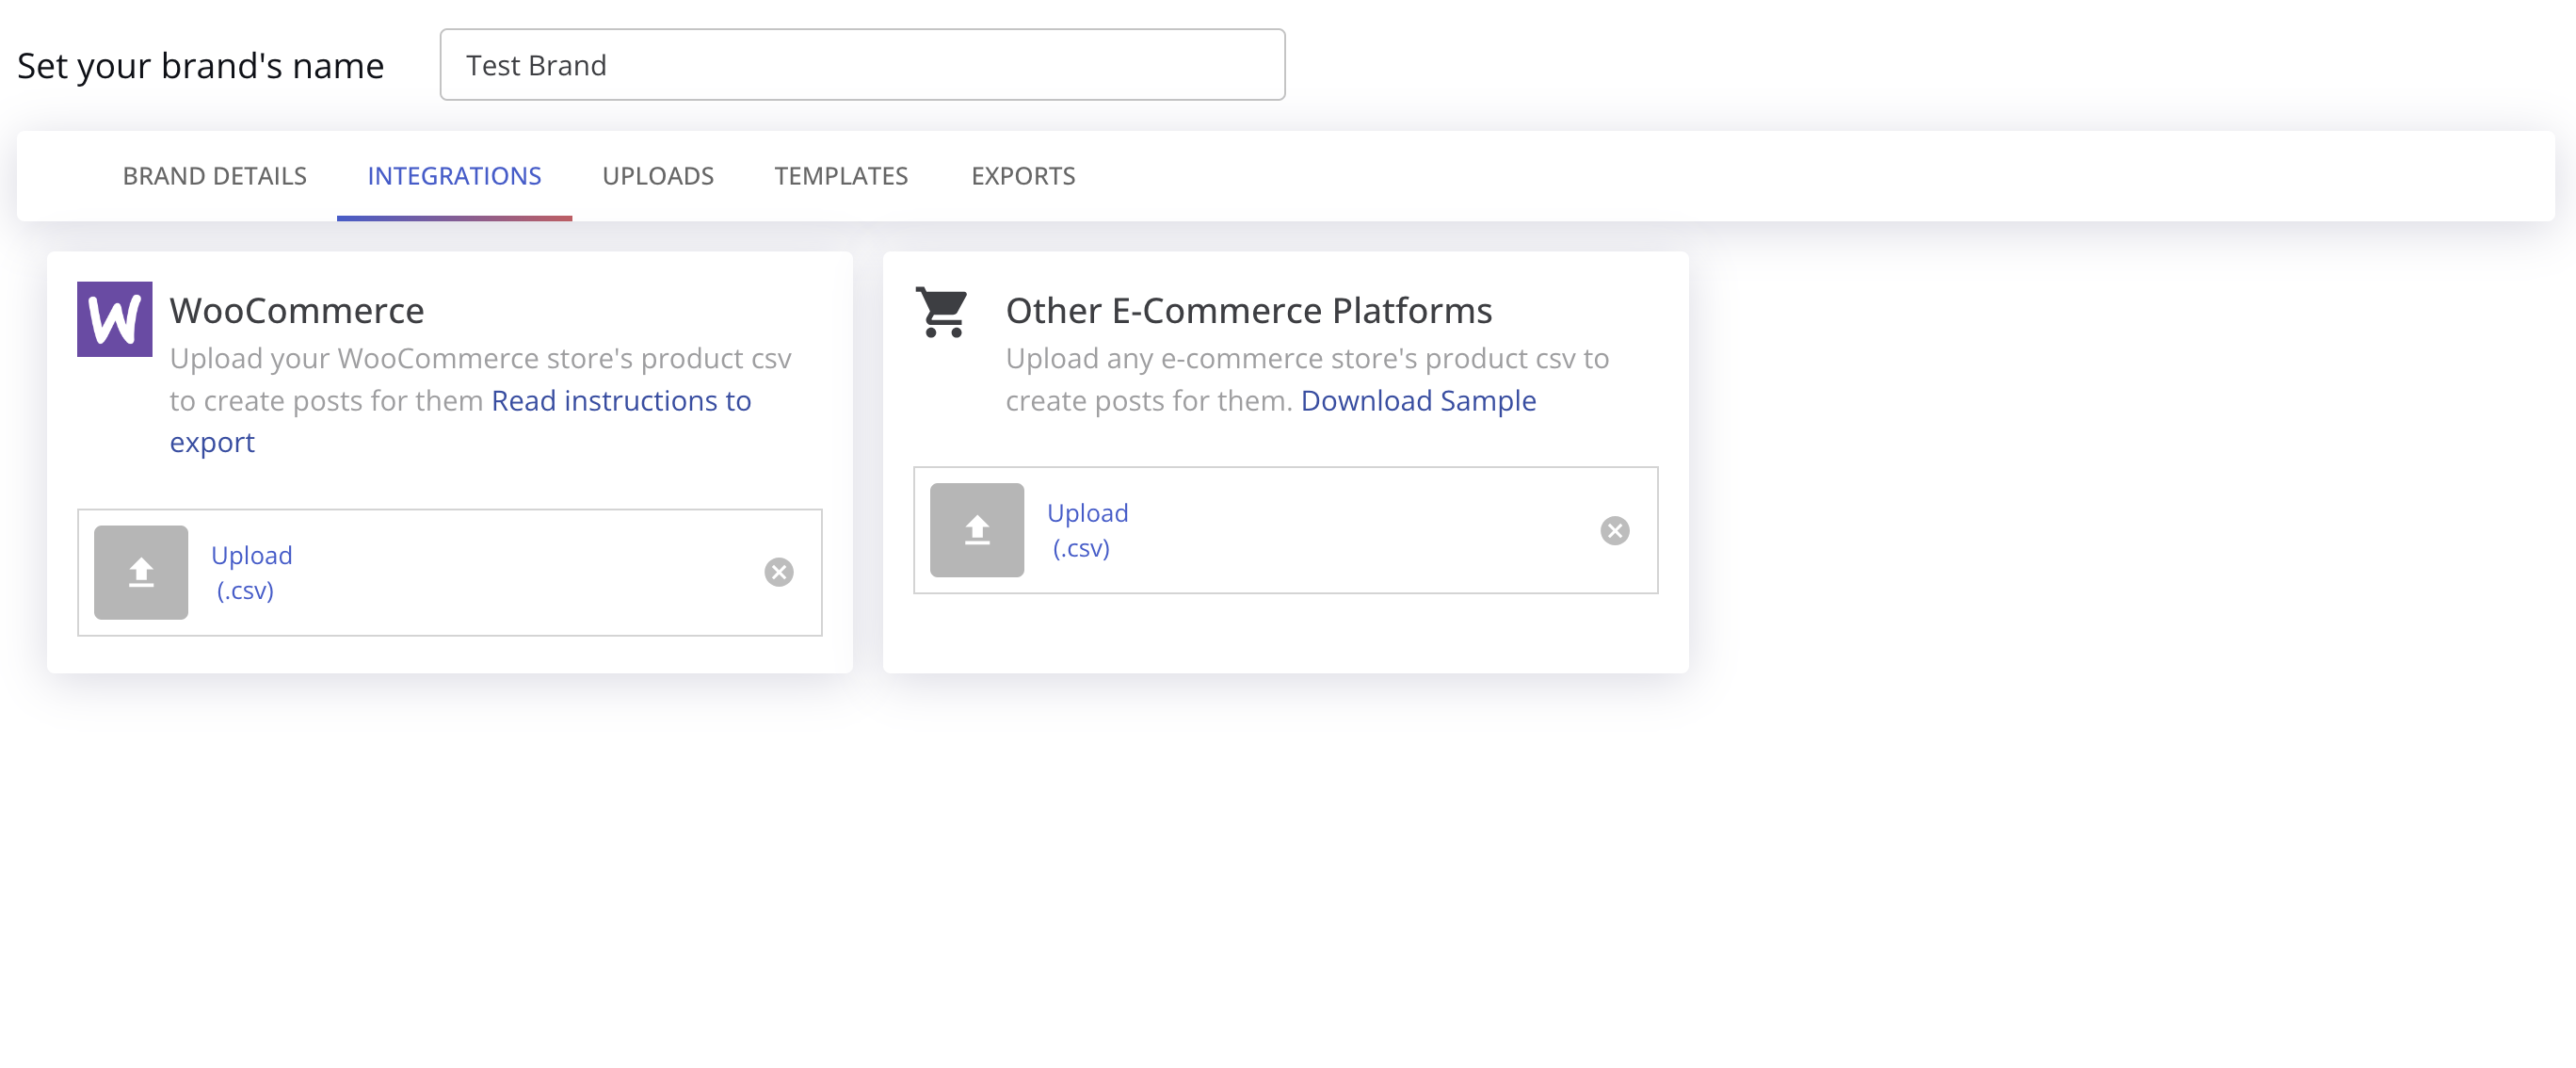
On the Integrations tab, you can upload your e-commerce product catalogs to create E-commerce Posts easily.
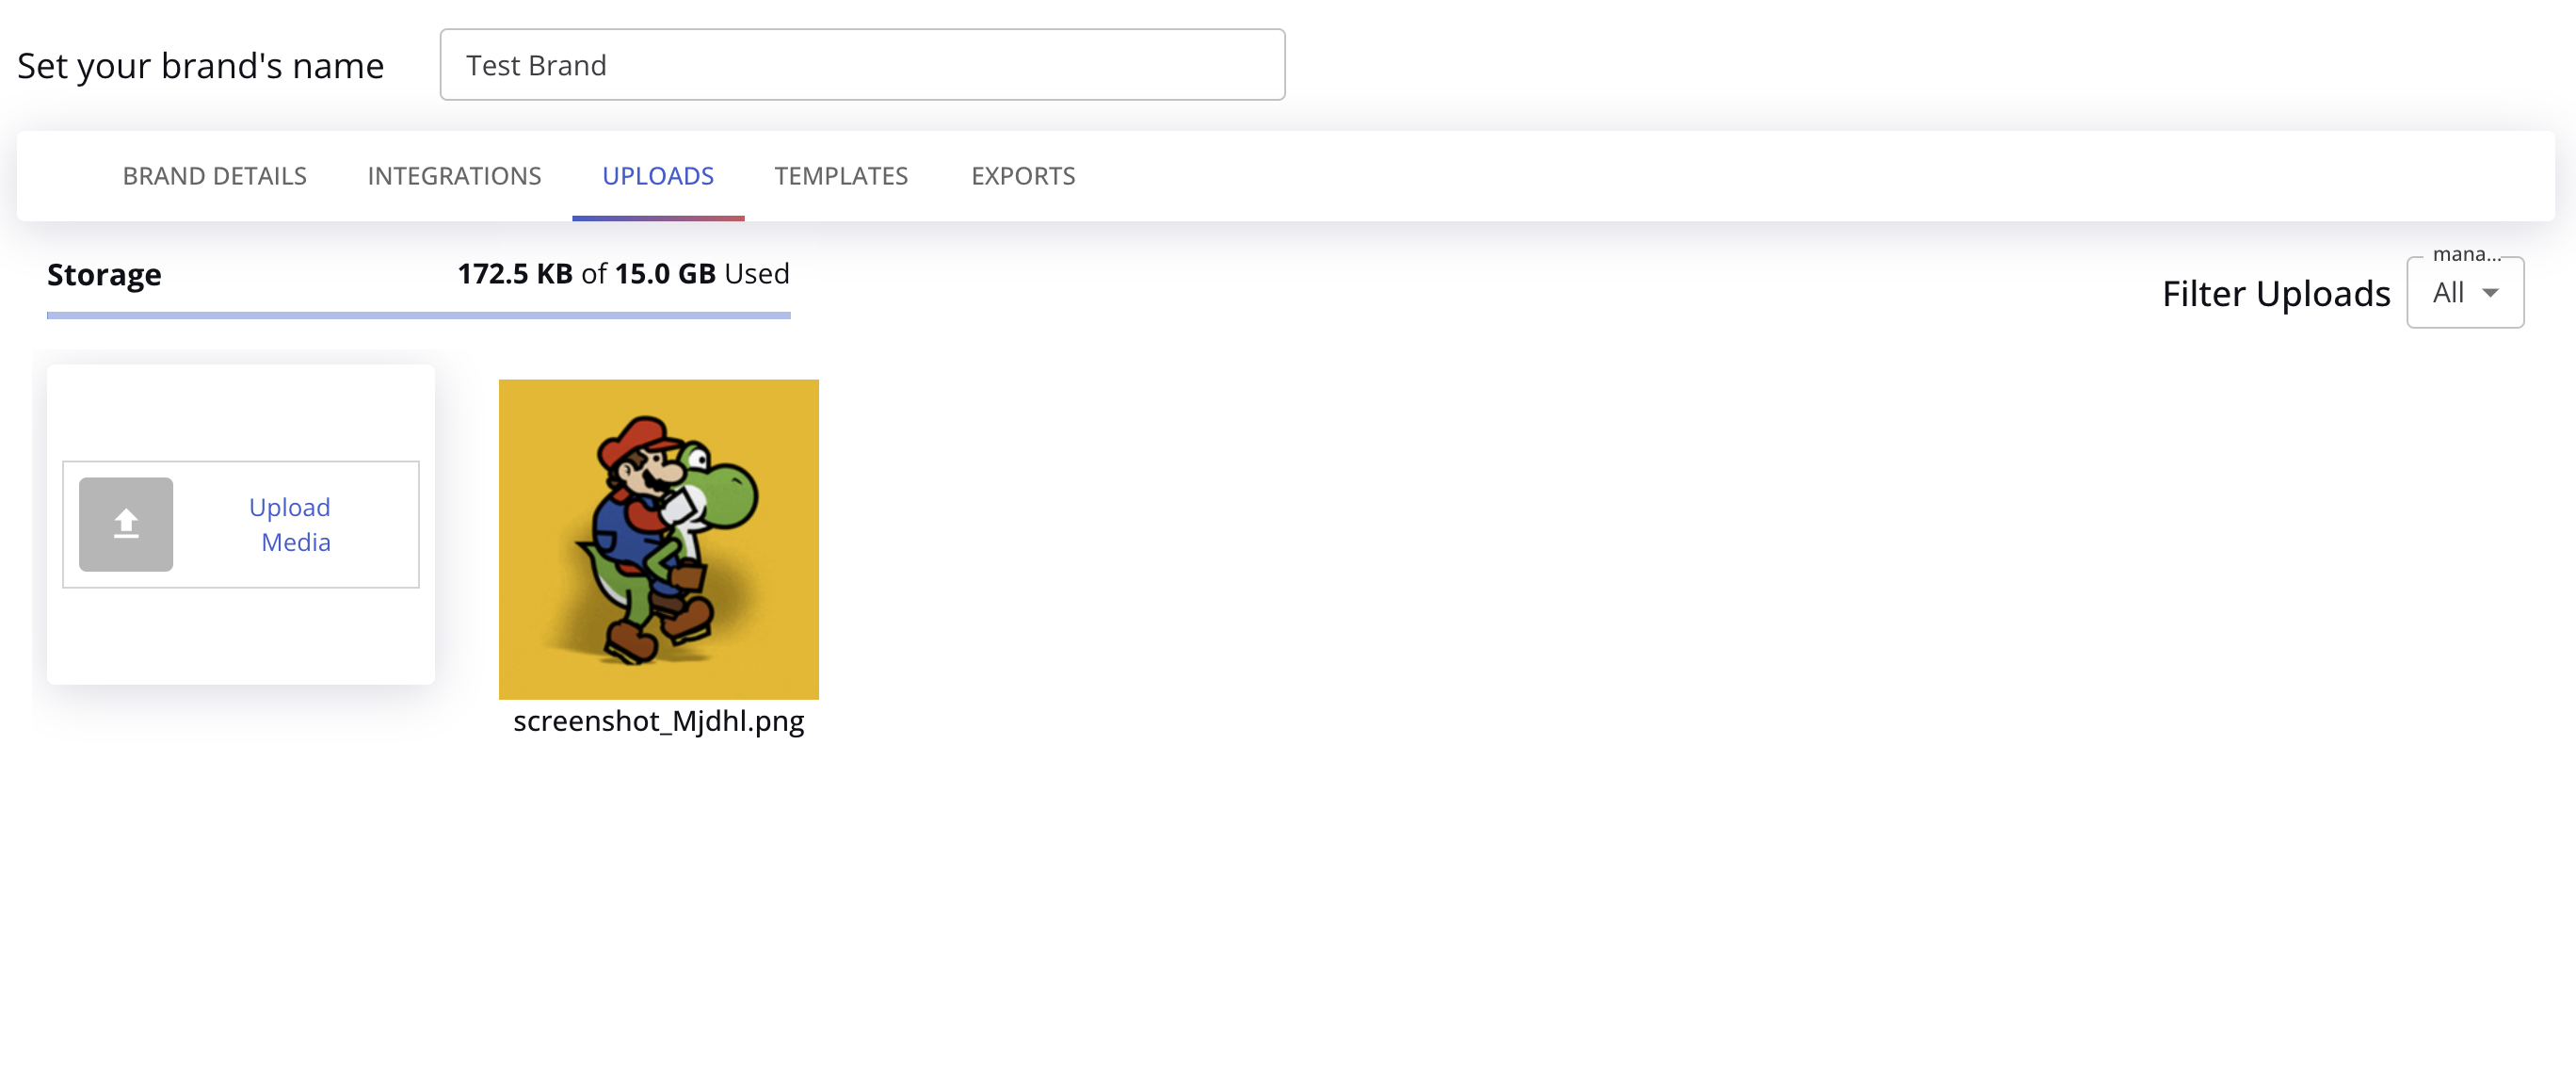
On the Uploads tab, you can upload image and video assets for use in your social posts.
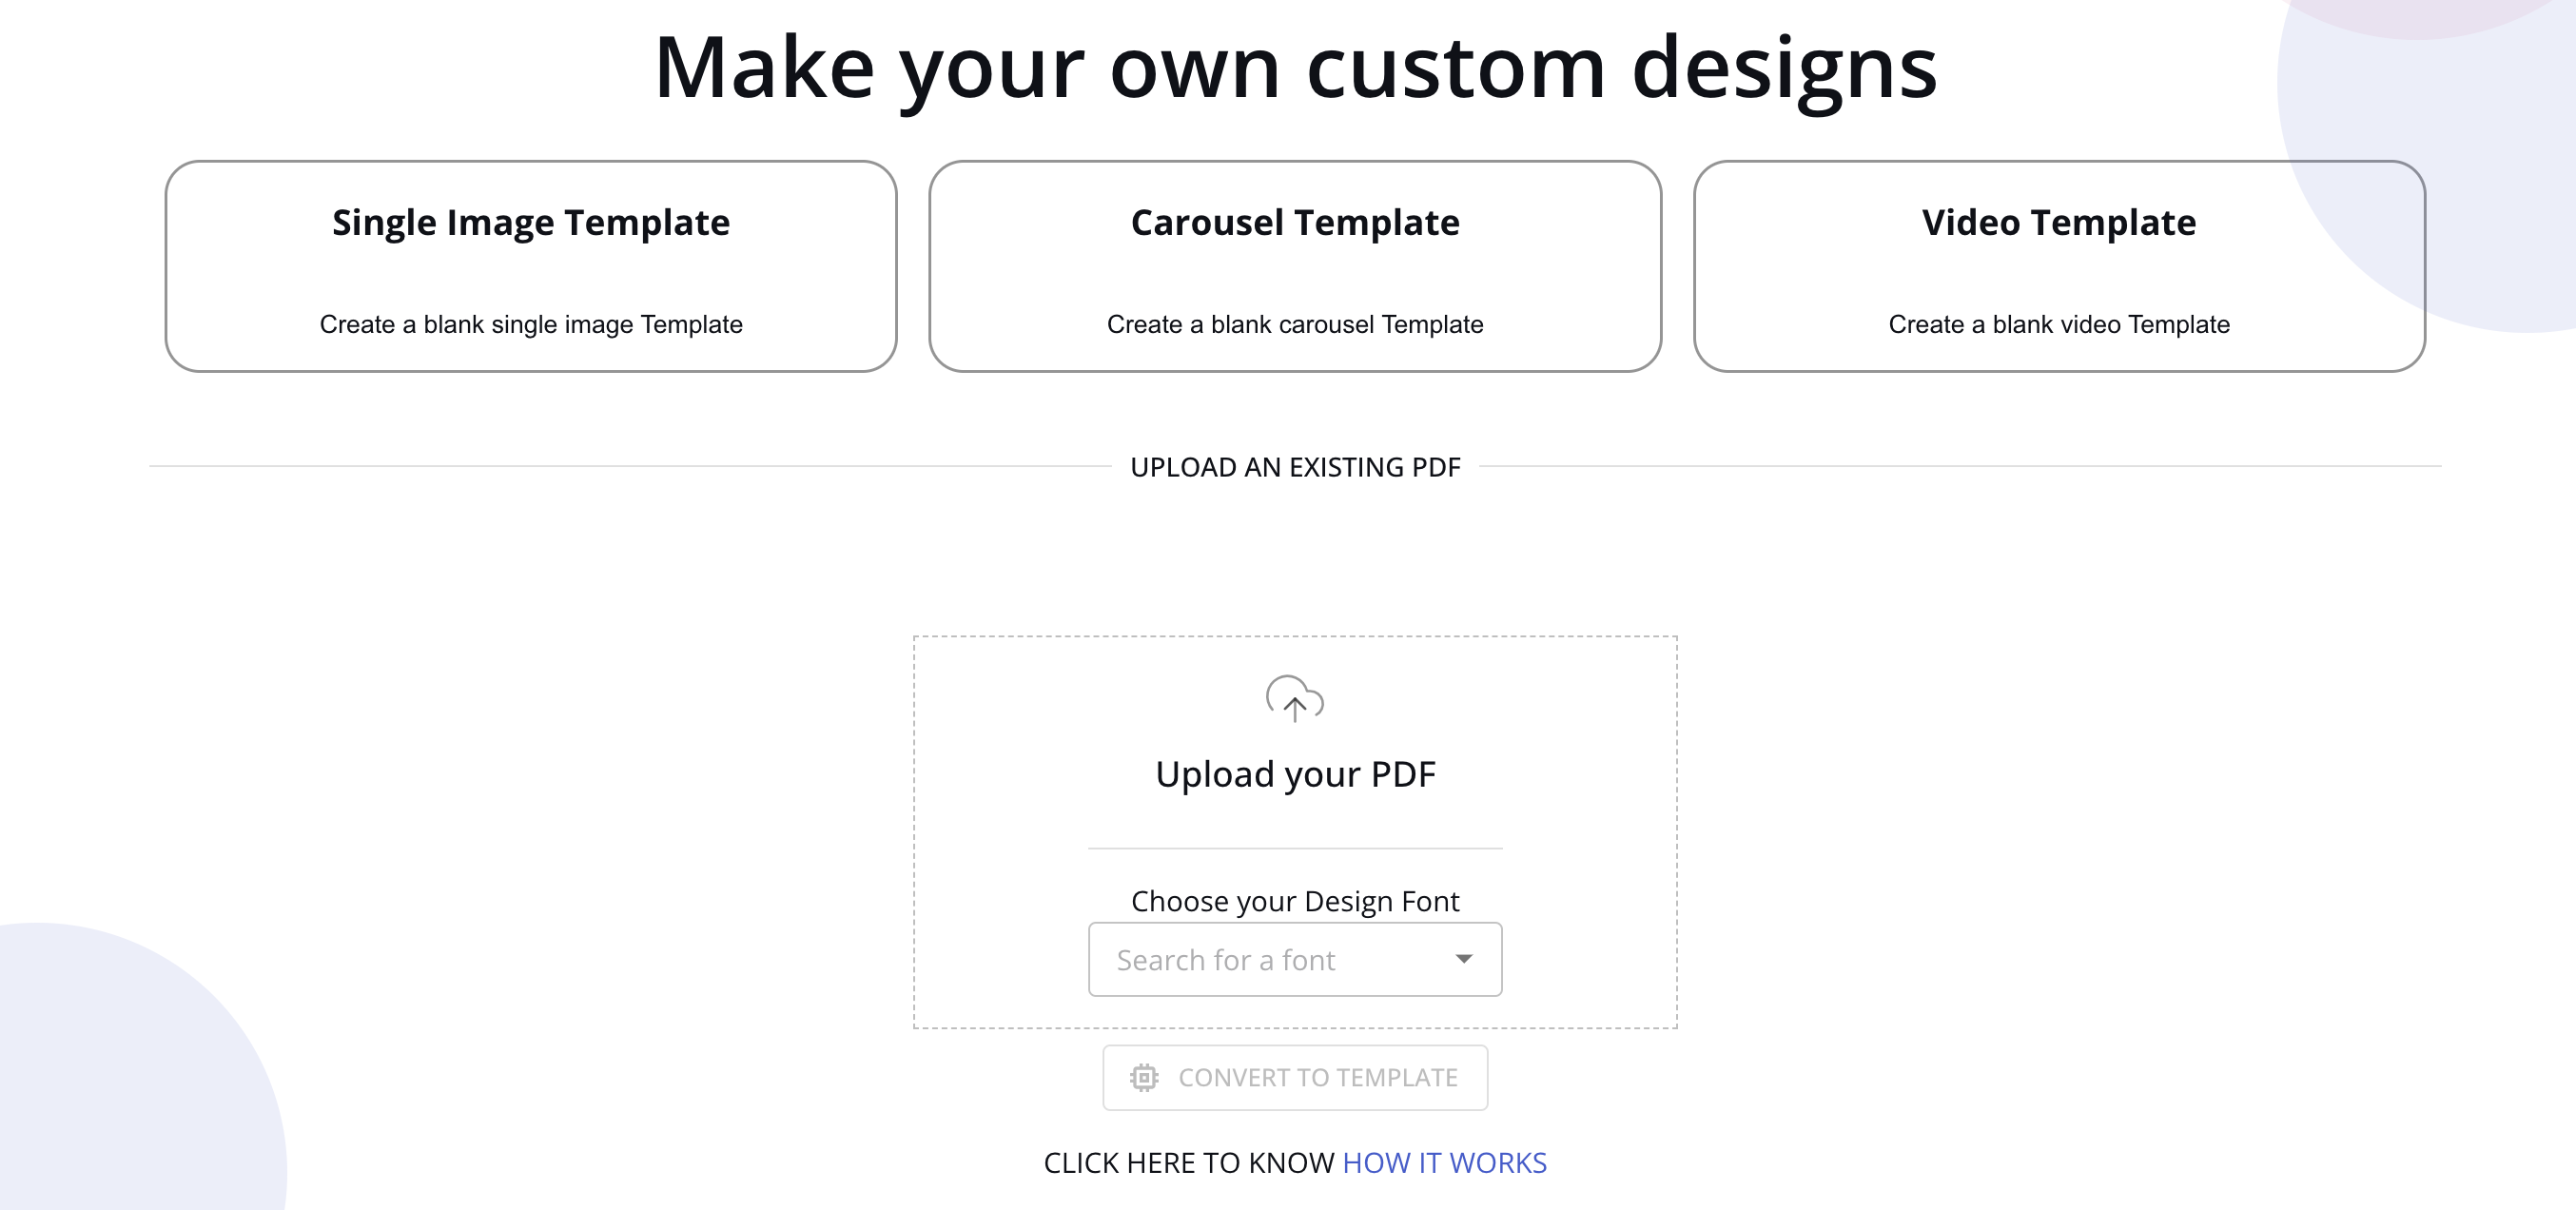
On the Templates tab, you can upload and save custom post templates for use in creating social content either manually or with the help of AI.
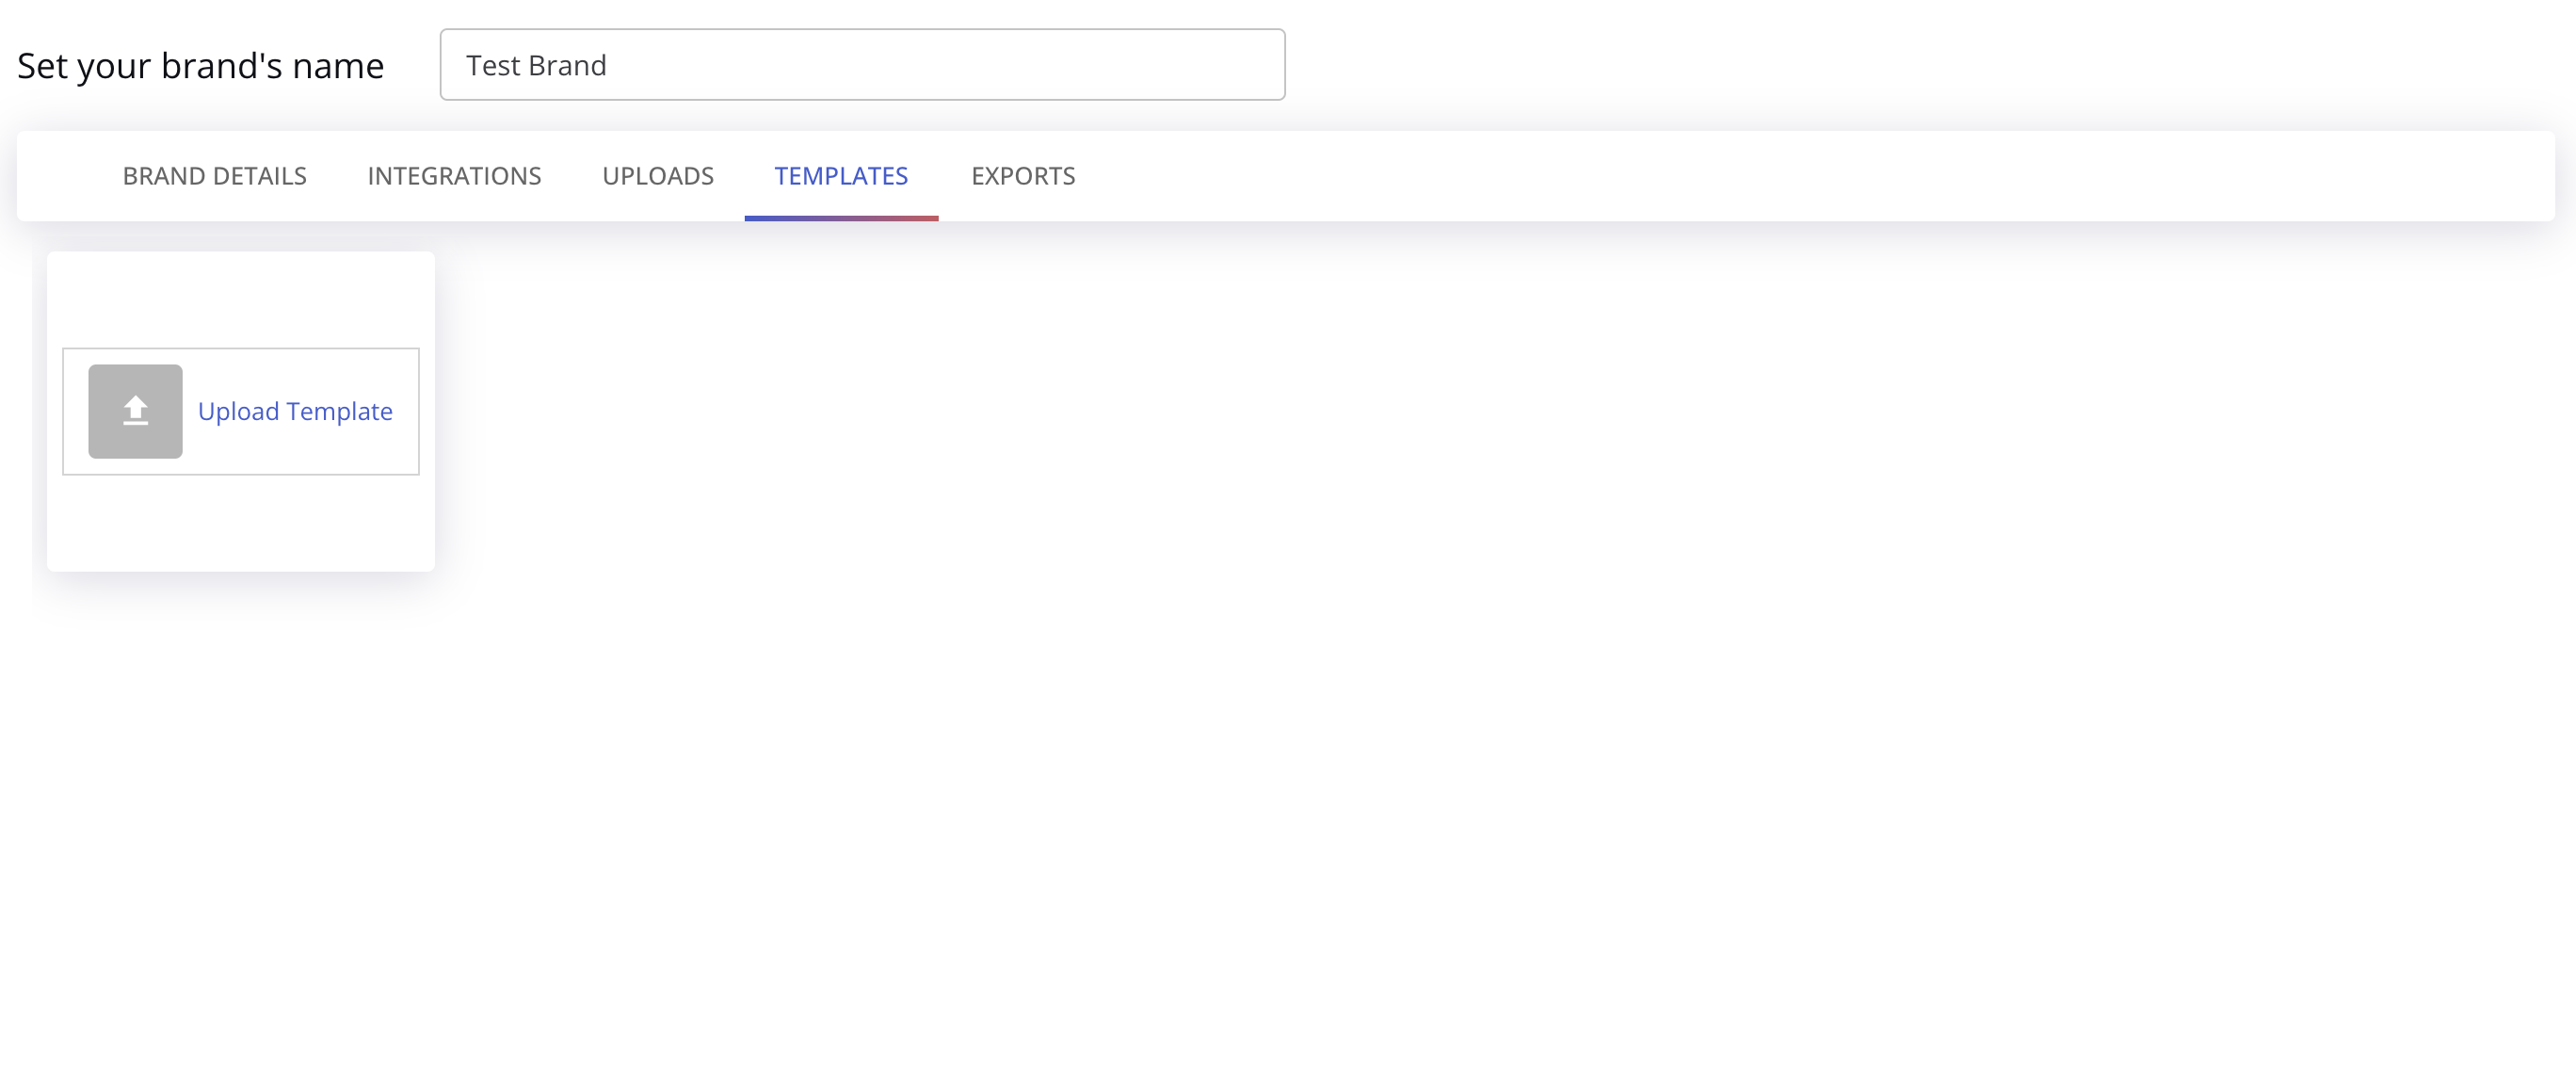
Here, you can upload your template design as a PDF and choose a design font, and the tool will automatically convert it into a template you can use.
You can also create a blank template and use the app’s editor to create your own custom design:
Finally, the Exports tab displays the status of your videos’ processing and downloading.
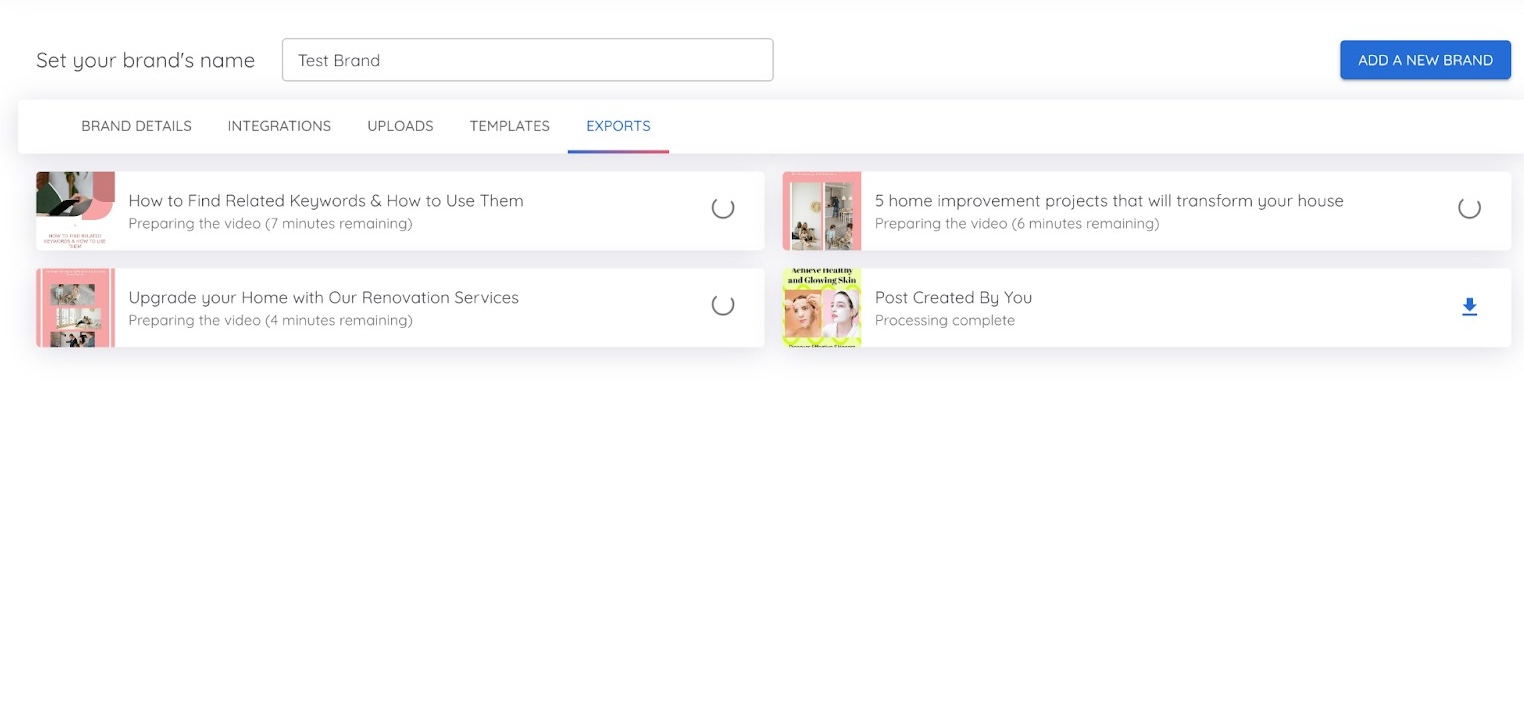 Here, you’ll be able to see all the videos that have been exported with one of the following statuses:
- Preparing the video
- Processing complete
- Error
It allows you to track the progress and identify any issues with your exported videos.
My Account
The final section, My Account, is where you can manage and update your current subscription.
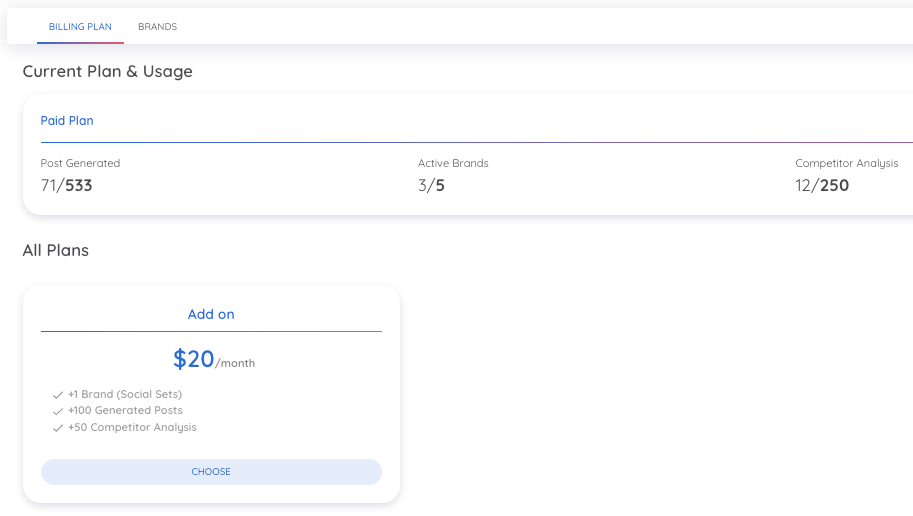
The Billing Plan tab has two tabs. First, under Current Plan & Usage, you can see how many posts, brands, and competitor analyses you still have available.
Second, under All Plans, you may add additional access to your plan. For $20/month, you can add one brand, 100 generated posts, and 50 additional competitor analyses.
Finally, the Brands tab shows a basic overview of each brand you’ve added to your account.
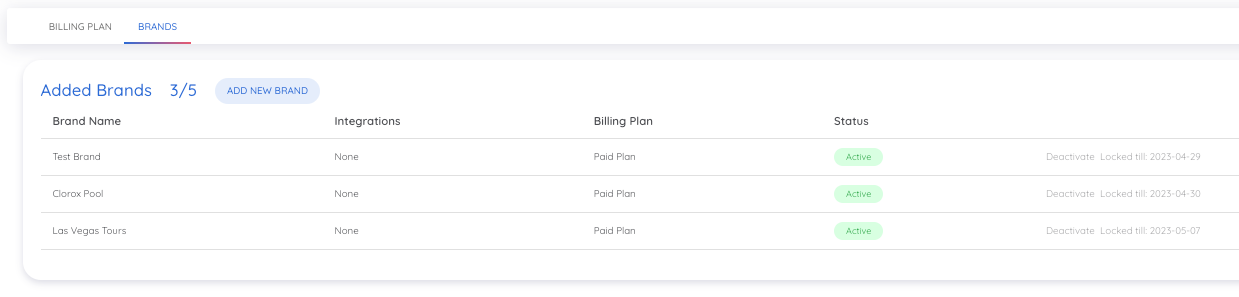
Here, you can click Add New Brand to create a new one, or deactivate a brand, if enough time has passed since creating it.
If you have other questions about the App Center or AI Social Content Generator, please email us directly at app-center@semrush.com.